Quickfort blueprint creation guide
Quickfort is a DFHack tool that helps you build fortresses from “blueprint” .csv and .xlsx files. Many applications exist to edit these files, such as MS Excel and Google Sheets. Most layout and building-oriented DF actions are supported through the use of multiple files or spreadsheets, each describing a different phase of DF construction: designating digging, defining zones, placing stockpiles, and building.
The original idea came from Valdemar’s auto-designation macro. Joel Thornton reimplemented the core logic in Python and extended its functionality with Quickfort 2.0. This DFHack-native implementation, called “DFHack Quickfort” or just “quickfort”, builds upon Quickfort 2.0’s formats and features, preserving compatibility with existing blueprints (where possible – DF itself has changed since then). In contrast with the earlier quickfort implementations, which interacted with DF by simulating keyboard input, DFHack Quickfort calls lower-level API functions to designate tiles and configure buildings. This allows for nearly instantaneous blueprint application, error checking and recovery, and many other advanced features.
This guide focuses on DFHack Quickfort’s capabilities and blueprint syntax, and teaches players how to understand and create blueprint files. Some of the text was originally written by Joel Thornton, reused here with his permission.
If you are just looking to apply existing blueprints to your fort, check out gui/quickfort (or quickfort for the commandline version). There are many ready-to-use blueprints available in the Quickfort blueprint library distributed with DFHack.
Before you become an expert at writing blueprints, though, you should know that the easiest way to make a quickfort blueprint is to build your plan “for real” in Dwarf Fortress and then export that section of your map using gui/blueprint. You can apply those blueprints as-is in your next fort, or you can fine-tune them with additional features from this guide.
See the Links section for more information and online resources.
Feature summary
General
Blueprint modes for all phases of fort design
Read blueprints from .csv or multi-worksheet .xlsx files
Near-instant application, even for very large and complex blueprints
Blueprints can span multiple z-levels
Easy sharing of blueprints with multi-blueprint files
Scripted application of sequences of blueprints
Undo applied blueprints
Rotate blueprints or flip them around
Automatic cropping of blueprints that extend off the map
Generate manager orders for items required by a blueprint
Includes a library of ready-to-use blueprints
Blueprint debugging
Dig mode
Supports all types of designations, including dumping/forbidding items and setting traffic settings
Supports setting dig priorities
Supports applying dig blueprints in marker mode
Handles carving arbitrarily complex minecart tracks, including tracks that cross other tracks
Zone and place modes
Define zones and stockpiles of any shape, not just rectangles
Configurable numbers of bins, barrels and wheelbarrows assigned to created stockpiles
Automatic splitting of stockpiles that exceed maximum dimension limits
Create and attach locations to zones
Full control over stockpile configuration based on the stockpiles settings library
Configurable zone/location settings, such as the pit/pond toggle or hospital supply quantities
Build mode
Integrated with DFHack buildingplan: you can place buildings before manufacturing building materials and you can use the buildingplan UI for setting materials and quality preferences
Designate entire constructions in mid-air without having to wait for each tile to become supported
Automatic expansion of building footprints to their minimum dimensions, so only the center tile of a multi-tile building needs to be recorded in the blueprint
Tile occupancy and validity checking so, for example, buildings that cannot be placed on a target tile will be skipped instead of causing errors and interrupting the blueprint. Blueprints that are only partially applied for any reason (e.g. you need to dig out some more tiles) can be safely reapplied to build the remaining buildings.
Relaxed rules for farm plot and road placement: you can still place the building even if an invalid tile (e.g. stone tiles for farm plots) splits the designated area into two disconnected parts
Intelligent boundary detection for adjacent buildings of the same type (e.g. a 6x6 block of
wjcells will be correctly split into 4 jeweler’s workshops)Set building properties (such as a name)
Can attach and configure track stops as part of hauling routes
Burrow mode
Supports creating, adding to, and subtracting from burrows.
Introduction to blueprints
We recommend using a spreadsheet editor such as Excel, Google Sheets, or LibreOffice to edit blueprint files, but any text editor will do.
The format of Quickfort-compatible blueprint files is straightforward. The first line (or upper-left cell) of the spreadsheet should look like this:
#dig
The keyword dig tells Quickfort we are going to be specifying designations.
The following “mode” keywords are understood:
Blueprint mode |
Description |
|---|---|
dig |
Designations (digging, traffic, dumping, etc.) |
build |
Constructions, buildings, and furniture |
place |
Stockpiles |
zone |
Activity zones |
If no modeline appears in the first cell, Quickfort assumes that it’s looking at
a #dig blueprint.
There are also other modes that don’t directly correspond to Dwarf Fortress design operations, but we’ll talk about those later.
If you like, you may enter a comment after the mode keyword. This comment will
appear in the output of quickfort list or in the dialog window when running
gui/quickfort. You can use this space for explanations, attribution, etc.:
#dig grand dining room
Below this line, begin entering keys in each spreadsheet cell that represent what you want designated in the corresponding game map tile. For example, we could dig out a 4x4 room like so (spaces are used as column separators here for readability, but a real .csv file would have commas):
#dig
d d d d #
d d d d #
d d d d #
d d d d #
# # # # #
The letter d here stands for “dig”. The character sequences in these
blueprints are based on the old (pre-v50) keyboard shortcuts for the various DF
menus. Please see the Appendix: Symbols and properties below for a full reference.
Note the # symbols at the right end of each row and below the last row. These are completely optional, but can be helpful to make the row and column positions clear.
In general, any cell that contains text that starts with a # is
interpreted as a comment and is ignored by quickfort. You can use this to
leave notes for yourself inside of a blueprint. Take care to start your comment
with a space after the # to avoid accidentally starting a modeline if your
comment happens to be in the first column and happens to start with a modeline
keyword. For example, #dig this area out is an accidental modeline that
will cause problems. However, # dig this area out is a safe comment.
Once the dwarves have that dug out, let’s zone it as a bedroom:
#zone
b b b b #
b b b b #
b b b b #
b b b b #
# # # # #
This looks very similar to the #dig blueprint above, but with bs
instead of ds. The bs mark the area for a bedroom zone just like
the #dig blueprint marked the area for digging. It’s important to wait
until after the area is completely dug out before applying further blueprints
since zones can’t be applied to hidden tiles and furniture can’t be built in
undug walls.
Now, let’s add some walls and furniture:
#build
Cw Cw Cw Cw #
Cw b  h  Cw #
Cw       Cw #
Cw Cw    Cw #
#  #  #  #  #
The Cw cells represent the constructed walls, leaving space for a door that we might want to add later. Quickfort uses buildingplan for managing buildings, so the walls will be built out of whatever matches the current buildingplan filter set for walls. Also note my generosity – in addition to the bed (b) I’ve built a container (h) for this lucky dwarf.
Finally, let’s place a booze stockpile in the 2 unoccupied tiles in the room:
#place personal booze stockpile
` ` ` ` #
` ~ ~ ` #
` f f{name="bedroom booze"}:=booze
` `   ` #
# # # # #
This illustration may be a little hard to understand. The two f characters are in row 3, columns 2 and 3. All the other cells are empty. QF considers both ` (backtick – the character under the tilde) and ~ (tilde) characters within cells to be empty cells; this can help with multilayer or fortress-wide blueprint layouts as “chalk lines”.
QF is smart enough to recognize this as a 2x1 food stockpile, and creates it as such rather than as two 1x1 food stockpiles. Quickfort treats any connected region of identical designations as a single entity. The tiles can be connected orthogonally or diagonally, just as long as they are touching. You can also treat disconnected segments as belonging to the same stockpile, but we’ll get into Label syntax later.
Now what’s all that business attached to the second f? The part between the
curly brackets specifies properties, in this case the name that we want to give
the stockpile. The remaining part, from the colon (:) onward, applies the
booze preset from the stockpiles library. That will configure the
stockpile to accept only booze. You can use presets (along with other options
that we’ll go over later) to configure stockpiles however you want, directly
from the #place blueprint.
And that’s it! You now have a series of blueprints that you can “stamp” across your fort to quickly build new bedrooms.
Area expansion syntax
In Quickfort, the following blueprints are equivalent:
#dig a 3x3 area
d d d #
d d d #
d d d #
# # # #

#dig the same area with d(3x3) specified in row 1, col 1
d(3x3)#
` ` ` #
` ` ` #
# # # #
The second example uses Quickfort’s “area expansion syntax”, which takes the form:
text(WxH)
Note that area expansion syntax can only specify rectangular areas. If you want to create extent-based structures (e.g. farm plots or stockpiles) in different shapes, use the first format above. For example:
#place A single L shaped food stockpile
f f ` ` #
f f ` ` #
f f f f #
f f f f #
# # # # #
Area expansion syntax also sets boundaries, which can be useful if you want adjacent, but separate, stockpiles of the same type:
#place Two touching but separate food stockpiles
f(2x2)  #
~ ~ ` ` #
f(4x2)  #
~ ~ ~ ~ #
# # # # #
As mentioned previously, ~ characters are ignored as comment characters and can be used for visualizing the blueprint layout. This blueprint can be equivalently written as:
#place Two touching but separate food stockpiles
f(2x2)  #
~ ~ ` ` #
f f f f #
f f f f #
# # # # #
since the area expansion syntax of the upper stockpile prevents it from combining with the lower, freeform syntax stockpile.
Area expansion syntax can also be used for buildings which have an adjustable size, like bridges. The following blueprints are equivalent:
#build a 4x2 bridge from row 1, col 1
ga(4x2)  `  #
`  `  `  `  #
#  #  #  #  #

#build a 4x2 bridge from row 1, col 1
ga ga ga ga #
ga ga ga ga #
#  #  #  #  #
If it is convenient to do so, you can place the cell with the expansion syntax in any corner of the resulting rectangle. Just use negative numbers to indicate which direction the designation should expand in. For example, the previous blueprint could also be written as:
#build a 4x2 bridge from row 2, col 4
`  `  `  `  #
ga(4x-2) `  #
#  #  #  #  #
Property syntax
Many things you can designate with quickfort are configurable. All buildings, stockpiles, and zones, for example, can be named. These configuration elements are expressed as properties.
Properties are written between curly brackets ({}). There can be multiple
properties defined between those brackets, separated by spaces. Each property
has a name and a value, with an equal sign to connect them. If a property value
has a space within it, it should be surrounded by double quotes (").
If you have defined the area of something over multiple spreadsheet cells, you can specify properties in just one of those cells and they will apply to the whole object. You can even split properties up among multiple cells if that is more convenient. If you are using expansion syntax, the expansion part always goes last.
Here’s an example of a seed stockpile that is configured to take from a seed feeder stockpile:
#place
f{name=Seeds links_only=true}:=seeds(3x2)

f
f{name="Seeds feeder" give_to=Seeds}:=seeds
f{containers=0}
Different modes and different types may have different properties that you can configure. See the Appendix: Symbols and properties for a full list.
Label syntax
Labels are different from the name property. They are only used internally
by Quickfort to associate tiles with a particular zones or stockpiles. This is
useful for when you want to define two touching zones or stockpiles of the same
type(s), but you can’t use expansion syntax because they are non-rectangular.
It is also useful for marking two disconnected regions as belonging to the
same zone or stockpile. Note that every tile in the zone or stockpile must be
marked with the same label:
#place two touching stockpiles of the same type
f/feed f/feed f/feed{name="Seeds feeder" containers=0}:=seeds
f/feed f      f/feed
f      f      f{name=Seeds links_only=true take_from="Seeds feeder"}:=seeds

#zone one pasture in two disconnected regions
n/slots n/slots n/slots

n/slots{name="Pasture slots"}(3x1)
Automatic area expansion
Buildings larger than 1x1, like workshops, can be represented in any of three ways. You can designate just their center tile with empty cells around it to leave room for the footprint, like this:
#build a stonecutter workshop in row 2, col 2 that will occupy the 3x3 area
` `  ` #
` wm ` #
` `  ` #
# #  # #
Or you can fill out the entire footprint like this:
#build a stonecutter workshop
wm wm wm #
wm wm wm #
wm wm wm #
#  #  #  #
This format may be verbose for regular workshops, but it can be very helpful for laying out structures like screw pump towers and waterwheels, whose “center point” can be non-obvious.
Or you can use area expansion syntax:
#build a stonecutter workshop
wm(3x3)  #
`  `  `  #
`  `  `  #
#  #  #  #
This style can be convenient for laying out multiple buildings of the same type. If you are building a large-scale block factory, for example, this will create 20 stonecutter workshops all in a row:
#build line of 20 stonecutter workshops
wm(60x3)
Quickfort will intelligently break large areas of the same designation into appropriately-sized chunks.
Multilevel blueprints
Multilevel blueprints are accommodated by separating Z-levels of the blueprint
with #> (go down one z-level) or #< (go up one z-level) at the end of
each floor.
#dig Stairs leading down to a small room below
j  `  `  #
`  `  `  #
`  `  `  #
#> #  #  #
u  d  d  #
d  d  d  #
d  d  d  #
#  #  #  #
The marker must appear in the first column of the row to be recognized, just like a modeline.
You can go up or down multiple levels by adding a number after the < or
>. For example:
#dig Two double-level quarries
r(10x10)
#>2
r(10x10)
#dig mode
#dig blueprints are normally the first step in any design. They define the
boundaries and layouts for the blueprints for later stages of construction.
Despite their name, #dig blueprints are for more than just digging. They
also handle smoothing, carving, traffic designations, and marking items on the
ground for dumping, forbidding, or other similar tags. See the full list of
supported designations in the #dig mode reference.
Dig priorities
DF designation priorities are supported in #dig blueprints. The full syntax
is [markers][symbol][number][expansion], where if the symbol is not
specified, d is assumed, and if number is not specified, 4 is
assumed (the default priority). So all of these blueprints are equivalent:
#dig dig the interior of the room at high priority
d  d  d  d  d  #
d  d1 d1 d1 d  #
d  d1 d1 d1 d  #
d  d1 d1 d1 d  #
d  d  d  d  d  #
#  #  #  #  #  #

#dig dig the interior of the room at high priority
d  d  d  d  d  #
d  d1(3x3)  d  #
d  `  `  `  d  #
d  `  `  `  d  #
d  d  d  d  d  #
#  #  #  #  #  #

#dig dig the interior of the room at high priority
4  4  4  4  4  #
4  1  1  1  4  #
4  1  1  1  4  #
4  1  1  1  4  #
4  4  4  4  4  #
#  #  #  #  #  #
At least one of the symbol and the priority number must be specified.
Dig markers
There are three types of markers you can apply to dig designated tiles. You can apply multiple markers to the same tile by including multiple marker prefixes. For example, a tile that is in blueprint mode and that is also marked for warm and damp dig would be written as:
#dig
mbmwmdd
Blueprint marker
“Blueprint” markers are useful for when you want to plan out your digging, but you don’t want to dig everything just yet. Here, “blueprint” refers to the vanilla UI “blueprint mode” vs. “standard mode” buttons. You can use DF’s “Change blueprints to standard selections” button to convert the “blueprint” marked tiles to regular designations.
For example, to dig out the perimeter of a room, but leave the center of the room marked for digging later:
#dig
d   d   d   d d #
d mbd mbd mbd d #
d mbd mbd mbd d #
d mbd mbd mbd d #
d   d   d   d d #
#   #   #   # # #
To apply an entire dig blueprint in blueprint marker mode, regardless of what
the blueprint itself says, you can set the global quickfort setting
force_marker_mode to true before you apply the blueprint by running
quickfort set force_marker_mode true.
Note that the state of the in-game vanilla button that you use to draw designations in either Standard or “Blueprint” mode does not have any effect on quickfort.
Warm and damp dig markers
Warm and damp dig markers allow digging to continue uninterrupted through warm or damp tiles. These markers are useful to include in blueprints that are expected to be applied near magma or in damp/aquifer layers. See the dig tool for more info on warm and damp dig.
The prefix for warm dig is mw and the prefix for damp dig is md.
Carved minecart tracks
In the game, you carve a minecart track by specifying a beginning and ending tile, and the game “adds” the designation to the tiles in between. You cannot designate single tiles because DF needs a multi-tile track to figure out which direction the track should go on each tile. For example to carve two track segments that cross each other, you might use the cursor to designate a line of three vertical tiles like this:
` start here ` #
` `          ` #
` end here   ` #
# #          # #
Then to carve the cross, you’d do a horizontal segment:
`          ` `        #
start here ` end here #
`          ` `        #
#          # #        #
This will result in a carved track that would be equivalent to a constructed track of the form:
#build
`      trackS    `      #
trackE trackNSEW trackW #
`      trackN    `      #
#      #         #      #
Quickfort supports both styles of specification for carving tracks with #dig
blueprints. You can use the “additive” style to carve tracks in segments or you
can use the track aliases to specify the track tile by tile. To designate
track segments, use area expansion syntax with a height or width of 1:
#dig
`      T(1x3) ` #
T(3x1) `      ` #
`      `      ` #
#      #      # #
“But wait!”, I can hear you say, “How do you designate a track corner that opens to the South and East? You can’t put both T(1xH) and T(Wx1) in the same cell!” This is true, but you can specify both width and height greater than 1, and for tracks, QF interprets it as an upper-left corner extending to the right W tiles and down H tiles. For example, to carve a track in a closed ring, you’d write:
#dig
T(3x3) ` T(1x3) #
`      ` `      #
T(3x1) ` `      #
#      # #      #
You can also use negative numbers in the expansion syntax to indicate corners that are not upper-left corners. This blueprint will also carve a closed ring:
#dig
T(3x3) ` `        #
`      ` `        #
`      ` T(-3x-3) #
#      # #        #
Or you could use the aliases to specify tile by tile:
#dig
trackSE trackEW trackSW #
trackNS `       trackNS #
trackNE trackEW trackNW #
#       #       #       #
The aliases can also be used to designate a solid block of track. This is especially useful for obliterating low-quality engravings so you can re-smooth and re-engrave with higher quality. For example, you could use the following sequence of blueprints to ensure a 10x10 floor area contains only masterwork engravings:
#dig smooth floor
s(10x10)
#dig engrave floor
e(10x10)
#dig erase low-quality engravings
trackNSEW(10x10)
The tracks only remove low-quality engravings since quickfort won’t designate masterwork engravings for destruction (unless forced to by a commandline parameter). You would run (and let your dwarves complete the jobs for) the sequence of blueprints until no tiles are designated by the “erase” blueprint.
#zone mode
Zones define how regions of your fort should be treated. They are also the anchor point for “locations” like taverns and hospitals. Unlike stockpiles or buildings, zones can overlap, which can lead to some interesting layouts. See the full list of zone symbols in the #zone mode reference.
Zone designation syntax
A zone is declared with a symbol followed by optional properties:
#zone a single tile garbage dump zone
d

#zone a single tile garbage dump zone named "The Dump"
d{name="The Dump"}

#zone interrogation room
o{name=Interrogation assigned_unit=sheriff}

#zone a small inactive pond zone
p{name="Fill me" pond=true active=false}(3x3)
If you want multiple zones that have the same footprint, they can be declared from the same cell:
#zone pasture and training area
n{name="Main pasture"}t{name="Pet training area"}(14x10)
or from different corners of the same rectangle:
#zone pasture and training area
n{name="Main pasture"}(10x2)
t{name="Pet training area"}(10x-2)
and you can use this technique to achieve partial overlap, of course. The only
configuration that can’t be specified in a single blueprint is multiple
non-rectangular zones that are partially overlapping. You will have to use
multiple #zone blueprints to achieve that.
You can also use labels (see Label syntax above) to separate adjacent non-rectangular zones that happen to be of the same type or to combine disconnected regions into a single zone.
Locations, locations, locations
Hospitals, guildhalls, taverns, libraries, and temples are locations. You can declare a location in the properties for a zone:
#zone metalcrafter hall
m{location=guildhall profession=metalcrafter}(7x7)
You can attach multiple zones to a single location by giving the location a label (not a name – you can name zones, but you can’t directly name locations) and then using that label for each of the zones you want to attach:
#zone tavern and rented room
b{location=tavern/bigpub name="Rent me"}(3x1)
h{location=tavern/bigpub name="Central pub" allow=residents}(25x40)
Note that the label (“bigpub” in this case) will never appear in-game. It is only used in the context of the blueprint to identify a common location.
#place mode
#place mode is dedicated to stockpiles, which are a major design element in
any fortress.
Stockpile designation syntax
Just like zones, stockpiles can have properties like names or lists of other stockpiles to take from. Unlike zones, stockpiles can have configuration specifiers for exactly what types of items to accept. The full syntax looks like this:
types/label{properties}:configuration(expansion)
with every component other than the type being optional. You’re already familiar with Property syntax, Label syntax, and Area expansion syntax, so let’s focus in on the remaining elements.
Stockpile types
The type of stockpile corresponds to the category of items it accepts. Some types will cause the stockpile to accept bins or barrels. See the full list in the #place mode reference.
It is very common to have stockpiles that accept multiple categories of items. Although it is perfectly valid to declare a single-purpose stockpile, quickfort also supports directly declaring all the categories at once. For example, to declare a 20x10 stockpile that accepts both corpses and refuse, you could write:
#place refuse heap
yr(20x10)
The order of the individual letters doesn’t matter. If you want to configure the stockpile from scratch, you can place unconfigured “custom” stockpiles with (c).
Bins, barrels, and wheelbarrows
Quickfort has global settings for default values for the number of bins, barrels, and wheelbarrows assigned to stockpiles, but these numbers can be set for individual stockpiles as well in the properties.
Individual properties for bins, barrels, and wheelbarrows are
supported. You can also set them all at once with the containers alias (it
usually just makes sense to set this to 0 when you don’t want any containers of
any type). For example:
#place a stone stockpile with five wheelbarrows
s{wheelbarrows=5}(3x3)

#place a bar, ammo, weapon, and armor stockpile with 20 bins
bzpd{bins=20}(5x5)

#place a weapon stockpile with no bins
p{containers=0}(9x2)
That last one could have equivalently used bins=0, but sometimes you just
don’t want to have to think about which stockpile types take which type of
container.
The container settings also have a shorthand form. If you add a number after a type symbol, you can set the relevant container count. The first example above could equivalently be written as:
#place a stone stockpile with five wheelbarrows
s5(3x3)
It sets the count for wheelbarrows specifically because the container associated with stone stockpiles is wheelbarrows.
If a stockpile has multiple types, it is the just the previous type symbol that
matters. s5e (stone and gems) would still set wheelbarrows only since the
5 comes directly after the s. se5 would set bins and not
wheelbarrows since the 5 would affect the container type associated with
gem stockpiles: bins.
If the number follows a type symbol that does not have a specific container type associated with it, then the container type defaults to wheelbarrows. This allows you to easily add wheelbarrows to furniture and corpse stockpiles, where having wheelbarrows is useful, but not added by default by the game.
If the specified number exceeds the number of available stockpile tiles, the number of available tiles is used. For wheelbarrows, that limit is reduced by 1 to ensure there is at least one non-wheelbarrow tile available in the stockpile. Otherwise no stone would ever be brought to the stockpile since all tiles would be occupied by wheelbarrows!
Generating manager orders for a #place blueprint with explicitly set
container/wheelbarrow counts will enqueue manager orders for the specified
number of containers or wheelbarrows, even if that number exceeds the in-game
size of the stockpile. For example, the following blueprint will enqueue orders
for 10 rock pots, even though the stockpile only has 9 tiles:
#place
f{barrels=10}(3x3)
Stockpile configuration
Quickfort uses the stockpiles plugin and The stockpiles settings library to configure stockpile settings, and provides a syntax that is easy to write in a blueprint yet still allows you to access the full power of the stockpiles command.
The syntax is:
: <op> <preset_name> [/<filter>] [<op> <preset_name> [/<filter>]...]
<op> is one of =, -, or +, representing the three stockpiles
import modes: set, disable, or enable, respectively. Note that if
you are using an = op, then it should go first in the list. Any =
configuration segment will override anything that comes before it.
For example, a blueprint like:
#place
f:=booze(5x4)
would be equivalent to creating a 5x4 food stockpile in the UI, then selecting it and running this command:
stockpiles import --mode=set booze
you can also add a slash (/) and a comma-separated list of filter strings
to customize the settings further:
#place
p{name="Metal weapons"}:-cat_weapons/other/(7x3)
Note that the “op” in this case lets us disable the matched preset, which in this case is the “Other materials” types in the Weapons category. This configuration is equivalent to the stockpiles command:
stockpiles import --mode=disable cat_weapons --filter=other/
And we can chain multiple stockpiles commands together by adding another “op” character and another preset:
#place
p{name="Steel weapons"}:-cat_weapons/mats/,other/+steelweapons(7x3)
which corresponds to running these two commands:
stockpiles import --mode=disable cat_weapons --filter=mats/,other/
stockpiles import --mode=enable steelweapons
With the combination of the library presets and custom filter strings, you can configure any stockpile any way you like!
#build mode
#build mode handles buildings, furniture (which are also “buildings”
according to DF), constructions (including constructed tracks), and hauling
routes.
Building designation syntax
The syntax is very similar to the syntax for stockpiles, except that it only makes sense to have a single symbol to indicate what to build on that tile:
symbol{properties}:configuration(expansion)
See the #build mode reference for properties that you can specify for each building type.
Here’s an example of a simple 5x5 square of flooring:
#build
Cf(5x5)
or a named Jeweler’s workshop that takes from specific stockpiles:
#build
wj{name="Encrusting center" take_from="Furniture,Gem storage"}
or a forge that specializes in high-quality armor:
#build
wf{name=Armorer labors=Armoring min_skill=Master}
The :configuration part is only relevant for hauling routes, which we’ll go
over in the next section.
Hauling route definitions
Hauling routes are defined by properties and configuration attached to track
stops. You can define a single-stop hauling route for a quantum stockpile as
easily as a multi-stop stone quarry transportation line. The stockpile-like
:configuration part of the syntax controls which item types are considered
“desired” for the hauling route stop. If it’s not specified, then all item
types are accepted. This is the most common case since most hauling route
contents are filtered by the stockpiles that the stops take from, but the
flexibility is there for when multiple stops take different items from the same
stockpile, or when a stop only wants a subset of items from a stockpile.
Here is a common setup for a quantum stone stockpile:
#place
s{name="Stone quantum" quantum=true} ~ s5{name="Stone feeder"}(3x3)
#build
~ trackstopW{take_from="Stone feeder" route="Stone dumper"}
This sets up the quantum stockpile and the feeder stockpile in the #place
blueprint, followed by the trackstop and the hauling route configuration in the
#build blueprint. The route property is the name of the hauling route
to create (or attach to if it already exists). If you are applying a quantum
stockpile blueprint more than once in a fort, be sure to avoid defining the
route property so that each application of the blueprint creates a unique
hauling route. Two quantum stockpiles on the same route will not function
properly (since one of the stops will be missing a minecart).
Let’s look at a slightly more complicated setup where we sort the stone into different output quantum stockpiles:
#place
s{name="Other stone quantum" quantum=true}    ~ s5e{name="Rock feeder"}(3x3)
s{name="Ore/clay stone quantum" quantum=true} ~
s{name="Gem quantum" quantum=true}            ~
#build
~ trackstopW{take_from="Rock feeder" route="Other stone"}:=otherstone
~ trackstopW{take_from="Rock feeder" route="Ore/clay"}:=cat_stone-otherstone
~ trackstopW{take_from="Rock feeder" route="Gems"}:=cat_gems
You can see how we make use of the stockpile-style configuration syntax to fine-tune the items desired by the hauling route stop.
Finally, let’s make a series of stops on a common hauling route. There is
nothing particularly special about this example. If the route property
names an existing route, the stop will be added to that route:
#dig
trackE trackEW trackEW trackW
#build
trackstop{route="Tick tock"} ~ ~ trackstop{route="Tick tock"}
These two track stops (which do not dump their contents) simply exist on a common route at the ends of a connected carved track.
#burrow mode
#burrow mode can create, extend, and remove tiles from burrows.
Burrow designation syntax
The syntax should look familiar by now:
symbol{properties}(expansion)
See the #burrow mode reference for symbol and property definitions.
Here’s how to create (or add to, if a burrow by that name already exists) a
5x5 burrow named Inside+. It will also register this burrow with
gui/civ-alert if no burrow has yet been registered:
#burrow
a{create=true name=Inside+ civalert=true}(5x5)
Why the trailing +? That’s to indicate to the burrow plugin that the
burrow should grow as adjacent tiles are dug out.
Similarly, here is how to erase a tile from all burrows that currently include it:
#burrow
e
Modeline markers
The modeline has some additional optional components that we haven’t talked about yet. You can:
give a blueprint a label by adding a
label()markerset a cursor offset and/or cursor placement hint by adding a
start()markerhide a blueprint from being listed with a
hidden()markerregister a message to be displayed after the blueprint is successfully applied with a
message()marker
The full modeline syntax, when all optional elements are specified, is:
#mode label(mylabel) start(X;Y;startcomment) hidden() message(mymessage) comment
Note that all elements are optional except for the initial #mode (though, as
mentioned in the first section, if a modeline doesn’t appear at all in the first
cell of a spreadsheet, the blueprint is interpreted as a #dig blueprint with
no optional markers). Here are a few examples of modelines with optional
elements before we discuss them in more detail:
#dig start(3; 3; Center tile of a 5-tile square) Regular blueprint comment
#build label(noblebedroom) No explicit 'start()' so cursor is in upper left
#meta label(digwholefort) start(center of stairs on surface)
#dig label(dig_dining) hidden() called by the digwholefort meta blueprint
#zone label(pastures) message(remember to assign animals to the pastures)
Blueprint labels
Labels are displayed in the blueprint selection dialog and the output of
quickfort list and are used for addressing specific blueprints when there
are multiple blueprints in a single file or spreadsheet sheet (see
Packaging a set of blueprints below). If a blueprint has no label, the label
becomes the ordinal of the blueprint’s position in the file or sheet. For
example, the label of the first blueprint will be “1” if it is not otherwise
set, the label of the second blueprint will be “2” if it is not otherwise set,
etc. Labels that are explicitly defined must start with a letter to ensure the
auto-generated labels don’t conflict with user-defined labels.
Start positions
Start positions specify a cursor offset for a particular blueprint, simplifying the task of blueprint alignment. This is very helpful for blueprints that are based on a central staircase, but it comes in handy whenever a blueprint has an obvious “center”. For example:
#build start(2;2;center of workshop) label(stonew) a stonecutter workshop
wm wm wm #
wm wm wm #
wm wm wm #
#  #  #  #
will build the workshop centered on the cursor, not down and to the right of the cursor.
The two numbers specify the column and row (or 1-based X and Y offset) where the
cursor is expected to be when you apply the blueprint. Position 1;1 is the
top left cell. The optional comment will show up in the blueprint listings and
should contain information about where to position the cursor. If the start
position is 1;1, you can omit the numbers and just add a comment describing
where to put the cursor. This is also useful for meta blueprints that don’t
actually care where the cursor is, but that refer to other blueprints that have
fully-specified start() markers. For example, a meta blueprint that refers
to the stonew blueprint above could look like this:
#meta start(center of workshop) a stonecutter workshop
/stonew
You can use semicolons, commas, or spaces to separate the elements of the
start() marker, whichever you prefer.
Hiding blueprints
A blueprint with a hidden() marker won’t appear in the blueprint listings
unless hidden blueprints are specifically requested. The primary reason for
hiding a blueprint (rather than, say, deleting it or moving it out of the
blueprints/ folder) is if a blueprint is intended to be run as part of a
larger sequence managed by a meta blueprint.
Messages
A blueprint with a message() marker will display a message after the
blueprint is applied. This is useful for reminding players to take manual steps
that cannot be automated, like assigning minecarts to a route, or listing the
next step in a series of blueprints. For long or multi-part messages, you can
embed newlines:
"#meta label(surface1) message(This would be a good time to start digging the industry level.
Once the area is clear, continue with /surface2.) clear the embark site and set up pastures"
The quotes surrounding the cell text are only necessary if you are writing a .csv file by hand. Spreadsheet applications will surround multi-line text with quotes automatically when they save/export the file.
Other blueprint modes
There are a few additional blueprint modes that become useful when you are sharing your blueprints with others or managing complex blueprint sets. Instead of mapping tile positions to map modifications like the basic modes do, these “blueprints” have specialized, higher-level uses:
Blueprint mode |
Description |
|---|---|
notes |
Display long messages, such as help text or blueprint walkthroughs |
ignore |
Hide a section of your spreadsheet from quickfort, useful for scratch space or personal notes |
meta |
Script sequences of blueprints together, transform them, and/or repeat them across multiple z-levels |
#notes mode
Sometimes you just want to record some information about your blueprints, such
as when to apply them, what preparations you need to make, or what the
blueprints contain. The message() modeline marker is
useful for small, single-line messages, but a #notes blueprint is more
convenient for long messages or messages that span many lines. The lines in a
#notes blueprint are output as if they were contained within one large
multi-line message() marker. For example, the following (empty) #meta
blueprint:
"#meta label(help) message(This is the help text for the blueprint set
contained in this file.

First, make sure that you embark in...) blueprint set walkthrough"
could more naturally be written as a #notes blueprint:
#notes label(help) blueprint set walkthrough
This is the help text for the blueprint set
contained in this file

First, make sure that you embark in...
The #meta blueprint is all squashed into a single spreadsheet cell, using
embedded newlines. Each line of the #notes “blueprint”, however, is in a
separate cell, allowing for much easier viewing and editing.
#ignore mode
If you don’t want some data to be visible to quickfort at all, use an
#ignore blueprint. All lines until the next modeline in the file or sheet
will be completely ignored. This can be useful for personal notes, scratch
space, or temporarily “commented out” blueprints.
#meta mode
#meta blueprints are blueprints that control how other blueprints are
applied. For example, meta blueprints can bundle a group of other blueprints so
that they can be run with a single command. They can also encode logic, like
rotating the blueprint or duplicating it across a specified number of z-levels.
Scripting blueprints together
A common scenario where meta blueprints are useful is when you have several phases to link together. For example you might:
Apply a dig blueprint to designate dig areas
Wait for miners to dig
Apply another dig blueprint to designate traffic costs
Apply a zone blueprint to designate zones
Apply a place buildprint to designate and configure stockpiles
Apply a build buildprint to designate buildings
Those last four “apply”s might as well get done in one command instead of four.
A #meta blueprint can help with that. A meta blueprint refers to
other blueprints in the same file by their label (see the Modeline markers
section) in the same format used by the quickfort command:
<sheet name>/<label>, or just /<label> for blueprints in .csv files or
blueprints in the same spreadsheet sheet as the #meta blueprint that
references them.
A few examples might make this clearer. Say you have a .csv file with blueprints that prepare bedrooms for your dwarves:
#dig label(bed1) dig out the rooms
...
#zone label(bed2) declare bedroom zones
...
#place label(bed3) add food stockpiles
...
#build label(bed4) build the furniture
...
Note how I’ve given them all labels so we can address them safely. If I hadn’t
given them labels, they would receive default labels of “1”, “2”, “3”, etc, but
those labels would change if I ever add more blueprints at the top. This is not
a problem if we’re just running the blueprints individually from
gui/quickfort or the quickfort list command, but meta blueprints need a
label name that isn’t going to change over time.
So let’s add a meta blueprint to this file that will combine the last three blueprints into one:
"#meta label(bed234) combines zone, place, and build blueprints"
/bed2
/bed3
/bed4
Now your sequence is shortened to:
Run /bed1 to designate dig areas
Wait for miners to dig
Run /bed234 meta buildprint to declare zones, place stockpiles, and build furniture
You can use meta blueprints to lay out your fortress at a larger scale as well.
The #< and #> notation is valid in meta blueprints, so you can, for
example, store the dig blueprints for all the levels of your fortress in
different sheets in a spreadsheet, and then use a meta blueprint to designate
your entire fortress for digging at once. For example, say you have a .xlsx
spreadsheet with the following layout:
Sheet name |
Contents |
|---|---|
dig_farming |
one #dig blueprint, no label |
dig_industry |
one #dig blueprint, no label |
dig_dining |
four #dig blueprints, with labels “main”, “basement”, “waterway”, and “cistern” |
dig_guildhall |
one #dig blueprint, no label |
dig_suites |
one #dig blueprint, no label |
dig_bedrooms |
one #dig blueprint, no label |
We can add a sheet named “dig_all” with the following contents (we’re expecting a big fort, so we’re digging 5 levels of bedrooms):
#meta label(dig_it) dig the whole fortress
dig_farming/1
#>
dig_industry/1
#>
dig_dining/main
#>
dig_dining/basement
#>
dig_dining/waterway
#>
dig_dining/cistern
#>
dig_guildhall/1
#>
dig_suites/1
#>
dig_bedrooms/1 repeat(down 5)
Note that for blueprints without an explicit label, we still need to address them by their auto-generated numeric label.
It’s worth repeating that #meta blueprints can only refer to blueprints that
are defined in the same file. This means that all blueprints that a meta
blueprint needs to run must be in sheets within the same .xlsx spreadsheet or
concatenated into the same .csv file.
You can then hide the blueprints that you now manage with the meta blueprint
from the blueprint selection lists by adding a hidden() marker to their
modelines. That way, the blueprint lists won’t be cluttered by blueprints that
you don’t need to run directly. If you ever do need to access the meta-managed
blueprints individually, you can still see them by toggling the “Hidden”
setting in the gui/quickfort load dialog or with quickfort list --hidden.
Meta markers
In meta blueprints, you can tag referenced blueprints with markers to modify how they are applied. These markers are similar to Modeline markers, but are only usable in meta blueprints. Here’s a quick list of examples, with more details below:
Example |
Description |
|---|---|
repeat(down 10) |
Repeats a blueprint down z-levels 10 times |
shift(0 10) |
Adds 10 to the y coordinate of each blueprint tile |
transform(cw flipv) |
Rotates a blueprint clockwise and then flips it vertically |
Repeating blueprints
Syntax: repeat(<direction>[, ]<number>)
The direction can be up or down, and the repetition works even for
blueprints that are themselves multi-level. For example:
#meta label(2beds) dig 2 levels of bedrooms
dig_bedrooms/1 repeat(down 2)

#meta label(6beds) dig 6 levels of bedrooms
/2beds repeat(down 3)
You can use < and > for short, instead of up and down. The comma
or space between the direction and the number is optional as well. The following
lines are all equivalent:
/2beds repeat(down 3)
/2beds repeat(down, 3)
/2beds repeat(>3)
Shifting blueprints
Syntax: shift(<x shift>[[,] <y shift>])
The values can be positive or negative. Negative values for x shift to the left, positive to the right. Negative values for y shift up, positive down. Note the semantics for the y axis are opposite compared to regular graphs on paper. This is because the y coordinates in the DF game map start a 0 at the top and increase as they go down.
Transforming blueprints
Syntax: transform(<transformation>[[,] <transformation>…])
Applies a geometric transformation to the blueprint. The supported transformations are:
- rotcw or cw:
Rotates the blueprint 90 degrees clockwise.
- rotccw or ccw:
Rotates the blueprint 90 degrees counterclockwise.
- fliph:
Flips the blueprint horizontally (left edge becomes right edge).
- flipv:
Flips the blueprint vertically (top edge becomes bottom edge).
If you specify more than one transformation, they will be applied in the order they appear in.
If you use both shift() and transform() markers on the same blueprint,
shifting is applied after all transformations are complete. If you want shifting
to be applied before the transformations, or in between transformations, you can
use nested meta blueprints. For example, the following blueprint will shift the
/hallway blueprint to the right by 20 units and then rotate it clockwise:
#meta label(shift_right) hidden()
/hallway shift(20)
#meta label(rotate_after_shift)
/shift_right transform(cw)
Transforming build blueprints will also change the properties of buildings that care about direction. For example, a bridge that opens to the North, rotated clockwise, will open to the East when applied to the map.
Packaging a set of blueprints
A complete specification for a section of your fortress may contain 4 or more separate blueprints, one for each “phase” of construction (dig, zone, place, build).
To manage all the separate blueprints, it is often convenient to keep related blueprints in a single file. For .xlsx spreadsheets, you can keep each blueprint in a separate sheet. Online spreadsheet applications like Google Sheets make it easy to work with multiple related blueprints, and, as a bonus, they retain any formatting you’ve set, like column sizes and coloring.
For both .csv files and .xlsx spreadsheets you can also add as many blueprints as you want in a single file or sheet. Just add a modeline in the first column to indicate the start of a new blueprint. Instead of multiple .csv files, you can concatenate them into one single file. This is especially useful when you are sharing your blueprints with others. A single file is much easier to manage than a directory of files.
For example, you can write multiple blueprints in one file like this:
#dig label(bed1)
d d d d #
d d d d #
d d d d #
d d d d #
# # # # #
#zone label(bed2)
b(4x4)  #
        #
        #
        #
# # # # #
#place label(bed3)
        #
f(2x2)  #
        #
       #
 # # # # #
#build label(bed4)
b   f h #
        #
        #
t c     #
# # # # #
Of course, you could still choose to keep your blueprints in separate files and just give related blueprints similar names:
bedroom.1.dig.csv
bedroom.2.zone.csv
bedroom.3.place.csv
bedroom.4.build.csv
The naming and organization is completely up to you.
Buildingplan integration
buildingplan is a DFHack plugin that keeps building construction jobs in a suspended state until the materials required for the job are available. This prevents a building designation from being canceled when a dwarf picks up the job but can’t find the materials. quickfort uses buildingplan to manage construction.
This means that buildingplan’s filters will be used for each
building type. For example, you can use the buildingplan UI to set the type of
stone you want your walls made out of. Or you can specify that all
buildingplan-managed chairs and tables must be of Masterful quality. The current
filter settings are saved with planned buildings when the #build blueprint
is run. You can set the filters the way you want for one blueprint, run the
blueprint, and then freely change the filters again for the next blueprint,
even if the first set of buildings haven’t been built yet.
Note that buildings are still constructed immediately if you already have the
materials. However, with buildingplan you now have the freedom to apply
#build blueprints before you manufacture the resources. The construction
jobs will be fulfilled whenever the materials become available.
Since it can be difficult to figure out exactly what source materials you need
for a #build blueprint, quickfort can autogenerate manager orders for
everything that a blueprint requires. See Generating manager orders for more
details on this. You can apply a blueprint, then the planned buildings will be
built as your dwarves fulfill the orders.
Generating manager orders
Quickfort can generate manager orders to make sure you have the proper items in
stock for a #build blueprint.
Many items can be manufactured from different source materials. Orders will always choose rock when it can, then wood, then cloth, then iron. You can always remove orders that don’t make sense for your fort and manually enqueue a similar order more to your liking. For example, if you want silk ropes instead of cloth ropes, make a new manager order for an appropriate quantity of silk ropes, and then remove the generated cloth rope order.
Anything that requires generic building materials (workshops, constructions, etc.) will result in an order for a rock block. One “Make rock blocks” job produces four blocks per boulder, so the number of jobs ordered will be the number of blocks you need divided by four (rounded up). You might end up with a few extra blocks, but not too many.
If you want your constructions to be in a consistent color, be sure to choose a rock type for all of your ‘Make rock blocks’ orders in the manager orders screen. You might also want to set the rock type for other non-block orders to something different if you fear running out of the type of rock that you want to use for blocks. You should also set the buildingplan material filter for construction building types to that type of rock as well so other blocks you might have lying around aren’t used.
Extra Manager Orders
In #build blueprints, there are a few building types that will generate
extra manager orders for related materials:
Track stops will generate an order for a minecart
Traction benches will generate orders for a table, mechanism, and rope
Levers will generate an order for an extra two mechanisms for connecting the lever to a target
Cage traps will generate an order for a cage
Stockpiles in #place blueprints that specify wheelbarrow or container
counts will generate orders for the appropriate
number of bins, pots, or wheelbarrows.
Tips and tricks
After digging out an area, you may wish to smooth and/or engrave the area before starting the build phase, as dwarves may be unable to access walls or floors that are behind/under built objects.
If you are designating more than one level for digging at a time, you can make your miners more efficient by using marker mode on all levels but one. This prevents your miners from digging out a few tiles on one level, then running down/up the stairs to do a few tiles on an adjacent level. With only one level “live” and all other levels in marker mode, your miners can concentrate on one level at a time. You just have to remember to “unmark” a new level when your miners are done with their current one. Alternately, if you have a chokepoint between levels (e.g. a central staircase), you can set the chokepoint to be dug at a lower priority than all the other tiles on the level. This will ensure your miners complete digging out a level before continuing on to the next.
As of DF 0.34.x, it is no longer possible to build doors at the same time that you build adjacent walls. Doors must now be built after adjacent walls are constructed. This does not affect the more common case where walls exist as a side-effect of having dug-out a room in a
#digblueprint, but if you are building your own walls, be aware that walls must be built before you run the blueprint to designate attached doors.Quickfort is a very powerful tool. See the case study below for more ideas on how to build awesome blueprints!
Caveats and limitations
Weapon traps and upright spear/spike traps can currently only be built with a single weapon.
Pressure plates can be built, but they cannot be usefully configured yet.
Building instruments is not yet supported.
DFHack Quickfort is a large project, and there are bound to be bugs! If you run into any, please report them at the DFHack issue tracker so they can be addressed.
Dreamfort case study: a practical guide to advanced blueprint design
While syntax definitions and toy examples will certainly get you started with your blueprints, it may not be clear how all the quickfort features fit together or what the best practices are, especially for large and complex blueprint sets. This section walks through the “Dreamfort” blueprints found in the DFHack blueprint library, highlighting design choices and showcasing practical techniques that can help you create better blueprints. Note that this is not a guide for how to design the best fort (there is plenty about that on the wiki). This is essentially an extended tips and tricks section focused on how to make usable and useful quickfort blueprints that will save you time and energy.
Almost every quickfort feature is used somewhere in Dreamfort, so the blueprints are very useful as reference examples. You can copy the Dreamfort blueprints and use them as starting points for your own, or just refer to them when you create something similar.
In this case study, we’ll start by discussing the high level organization of the Dreamfort blueprint set. Then we’ll walk through the spreadsheets for each of the fort levels in turn, calling out feature usage examples and explaining the parts that might not be obvious just from looking at them.
If you haven’t built Dreamfort before, maybe try an embark in a relatively flat area and take it for a spin! It will help put the following sections in context. There is also a pre-built Dreamfort available for download on dffd if you just want an interactive reference.
Dreamfort organization and packaging
The Dreamfort blueprints are distributed with DFHack as one large .csv file, but editing in that format would be frustrating. Instead, the blueprints are edited online as Google drive spreadsheets. Either the .csv file or the .xlsx files can be read and applied by quickfort, but it made more sense to distribute the blueprints as a .csv so players would only have to remember one filename. Also, .csv files are text-based, which works more naturally with the DFHack source control system. We use the xlsx2csv utility to do the conversion from .xlsx to .csv format.
Each spreadsheet has a “help” sheet with a #notes blueprint that displays a
walkthrough and other useful details. This is the first sheet in each
spreadsheet so it will be selected by default if the user doesn’t specify a
label name. For example, just running quickfort run
library/dreamfort.csv will display Dreamfort’s introduction text.
Do not neglect writing the help text! Not only will it give others a chance to use your blueprints appropriately, but the help you write will remind you what you were thinking when you wrote the blueprint in the first place.
The surface level: how to manage complexity
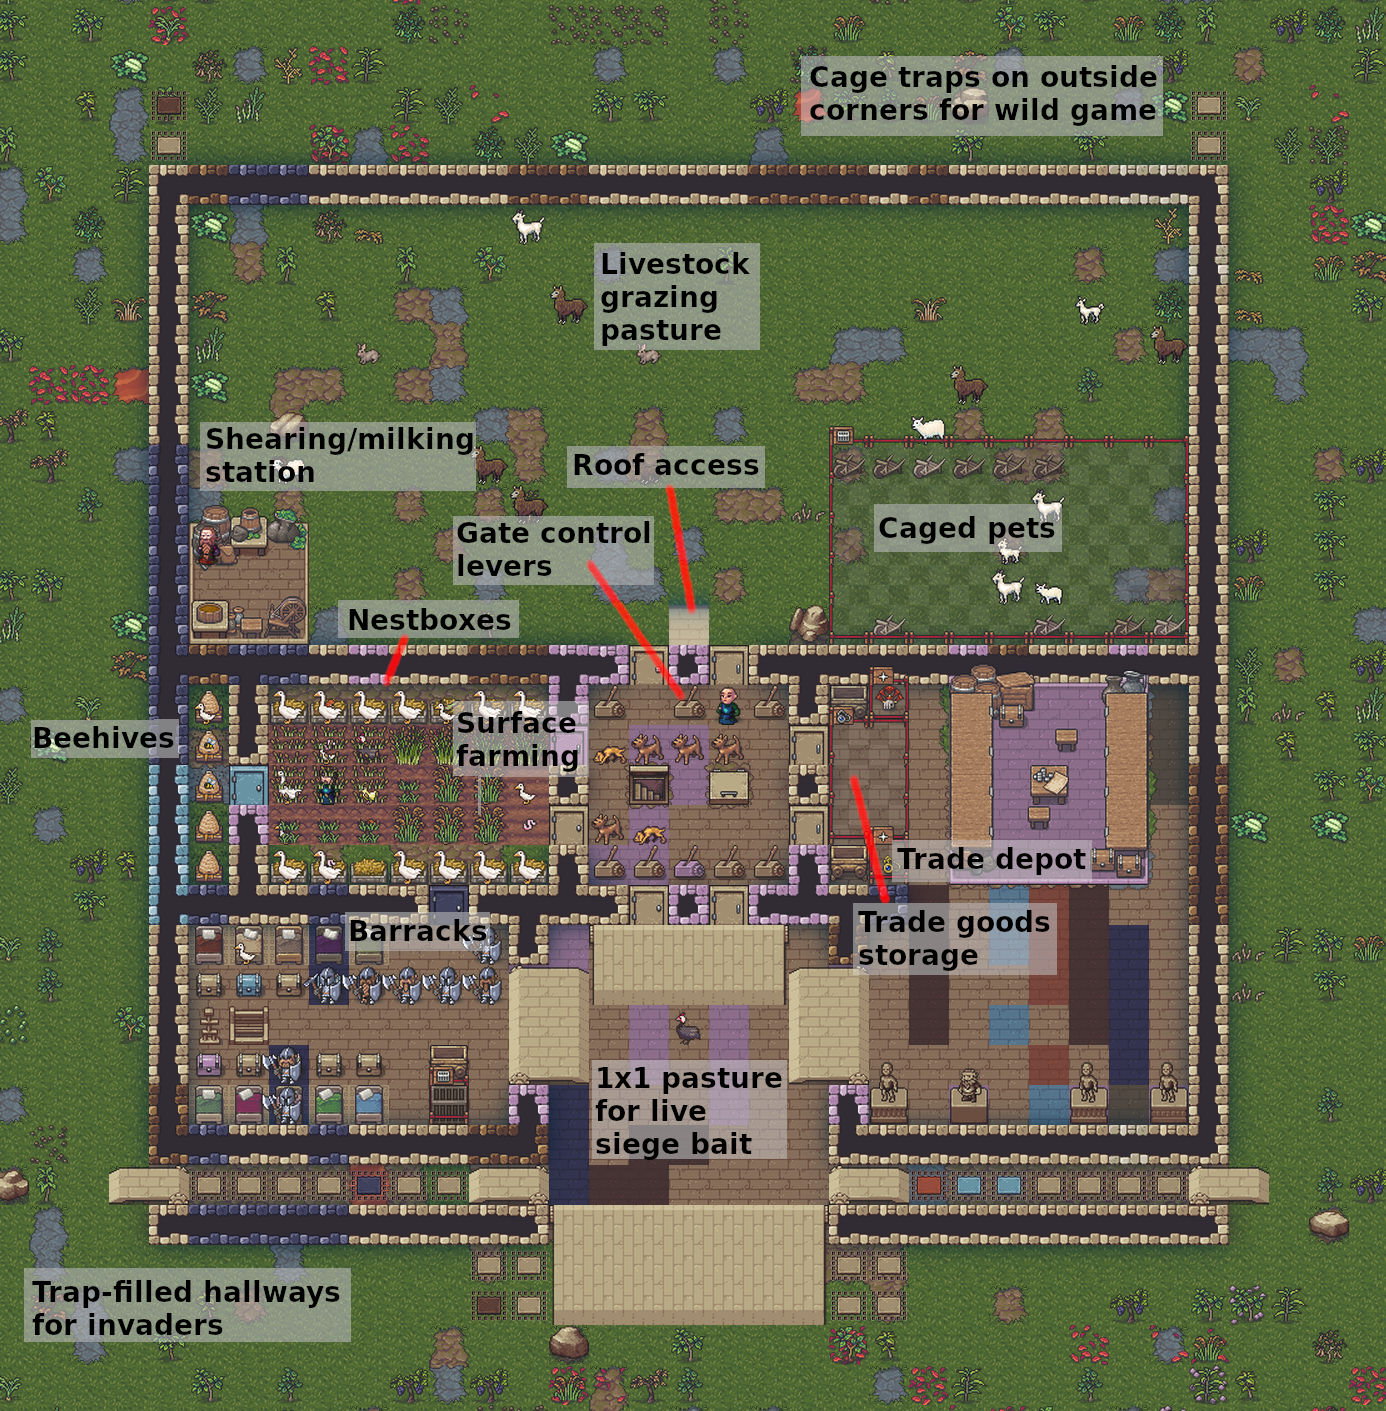
For smaller blueprints, packaging and usability are not really that important - just write it, run it, and you’re done. However, as your blueprints become larger and more detailed, there are some best practices that can help you deal with the added complexity. Dreamfort’s surface level is many steps long since there are trees to be cleared, holes to be dug, flooring to be laid, and bridges to be linked to control levers, and each step requires the previous step to be completely finished before it can begin. Therefore, a lot of thought went into minimizing the toil associated with applying so many blueprints.
The single most effective way to make your blueprint sets easier to use is to
group them with meta blueprints. For the Dreamfort set of
blueprints, each logical “step” generally takes more than one blueprint. For
example, with #meta blueprints, setting up pastures with a #zone
blueprint, placing starting stockpiles with a #place blueprint, and building
starting workshops with a #build blueprint can all be done with a single
command. Bundling blueprints with #meta blueprints reduced the number of
steps in Dreamfort from 100 to about 25, and it also made it much clearer to
see which blueprints can be applied at once without unpausing the game. Check
out dreamfort_surface’s “meta”
sheet to see how much meta blueprints can simplify your life.
You can define as many blueprints as you want on one sheet, but this is especially useful when writing meta blueprints. It’s like having a bird’s eye view of your entire plan in one sheet.
If a blueprint is bundled into a meta blueprint, it does not need to appear in
the gui/quickfort blueprint load dialog or quickfort list output since
you won’t be running it directly. Add a hidden() marker to
those blueprints to keep the list output tidy. You can still access hidden
blueprints by toggling the “Hidden” setting in gui/quickfort or by passing the
--hidden option to quickfort list if you need to, for example to
reapply a partially completed #build blueprint, but now they won’t clutter
up the normal blueprint list.
This goes for both the file name and the modeline label().
Searching and filtering is implemented for both gui/quickfort and the
quickfort list command. If you give related blueprints a common prefix, it
makes it easy to set the filters to display just the blueprints that you’re
interested in. If you have a lot of blueprints, this can save you a lot of
time. Dreamfort uses the level name as a prefix for the labels, like
“surface1”, “surface2”, “farming1”, etc. So if I’m in the middle of applying
the surface blueprints, I’d set the filter to dreamfort surface to just
display the relevant blueprints.
If you’ve been away from Dwarf Fortress for a while, it’s easy to forget what your blueprints actually do. Make use of modeline comments so your descriptions are visible in the blueprint list. If you use meta blueprints, all your comments can be conveniently edited on one sheet, like in surface’s meta sheet.
Messages are displayed after a blueprint is applied. Good things to include in messages are:
The name of the next blueprint to apply and when to run it
Whether orders should be generated for the current or an upcoming step
Any actions that you have to perform manually after running the blueprint, like assigning minecarts to hauling routes or pasturing animals in newly-created zones
These things are just too easy to forget. Adding a message() can save you
from time-wasting mistakes. Note that message() markers can still appear on
the hidden() blueprints, and they’ll still get shown when the blueprint is
run via a #meta blueprint. For an example of this, check out the zones
sheet
where the pastures are defined.
The farming level: fun with stockpiles
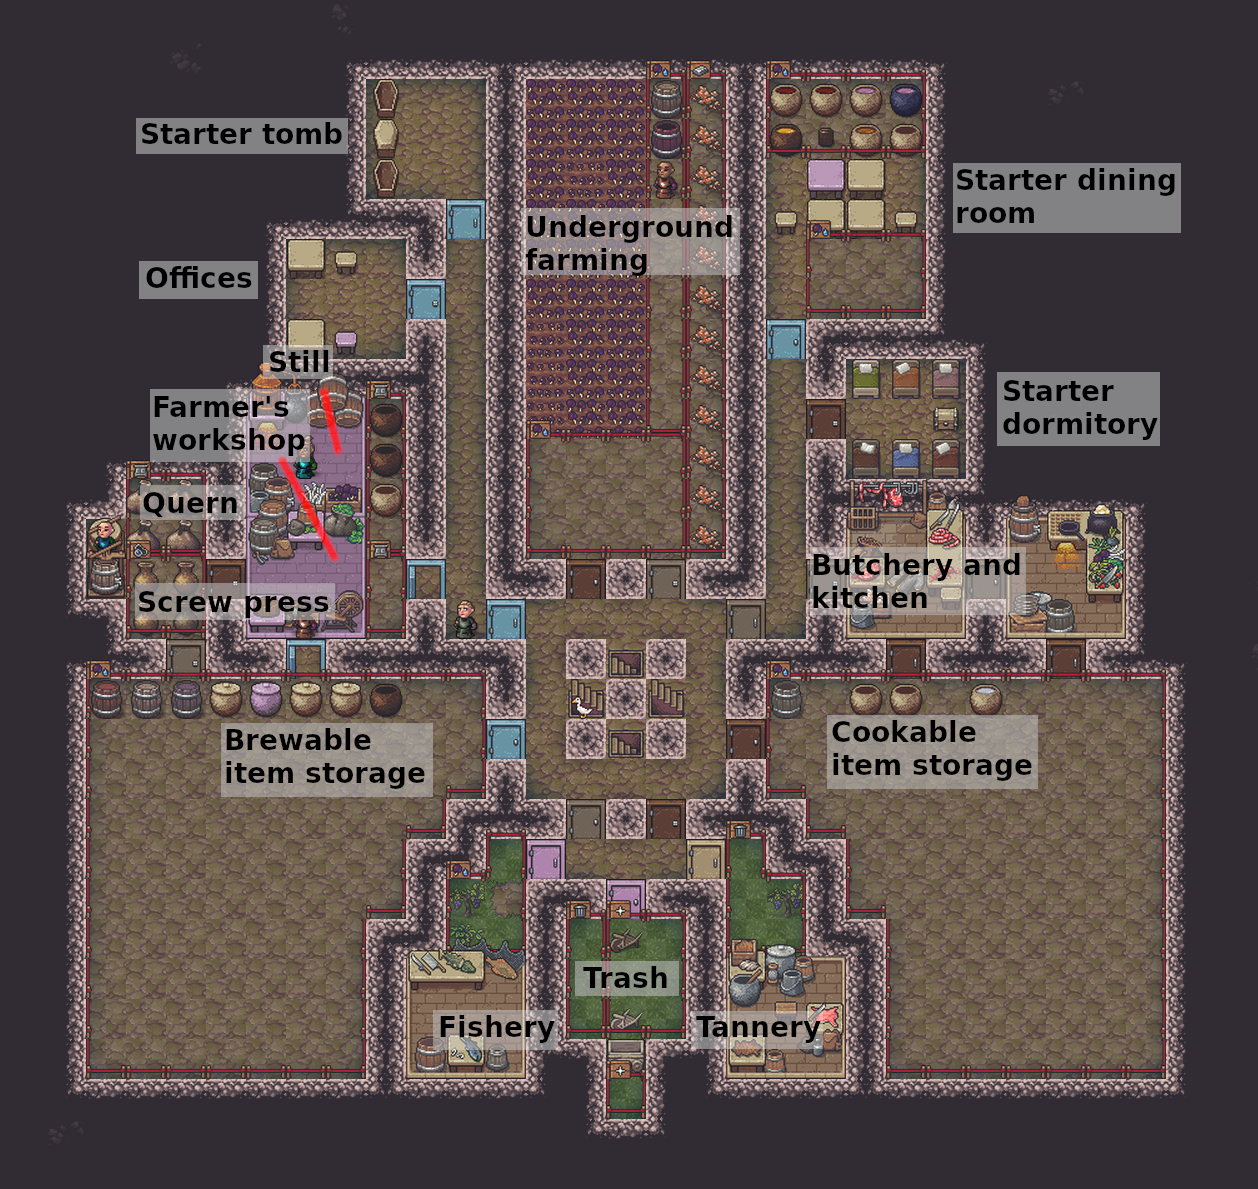
It is usually convenient to store closely associated blueprints in the same spreadsheet. The farming level is very closely tied to the surface because the miasma vents dug on the surface have to perfectly line up with where rottables can accumulate on the farming level. However, surface is a separate z-level and, more importantly, already has many many blueprints of its own. Farming is therefore split into a separate file.
The farming level starts doing interesting things with stockpiles in its
#place blueprints. Note the careful customization
of the food stockpiles and the stockpile chains set up with the take_from
and give_to properties. For example, the “Seeds” stockpile is set to
link_only=true and the “Seeds feeder” stockpile has containers=0 and
give_to=Seeds. This minimizes container churn for the common task of seed
recovery. When finding the named stockpiles to link, quickfort will search the
other stockpiles created in the same blueprint first. If no stockpiles by that
name are found, then existing stockpiles/workshops are searched. This is how
many of the stockpiles on this level are configured to take from the starter
stockpiles on the surface.
Hauling routes are notoriously fiddly to set up by hand, but they can be easily
automated with blueprints. Check out the Southern area of the #place and
#build blueprints for how the quantum refuse dump is configured with simple
take_from and route properties attached to the track stop.
The industry level: advanced linking
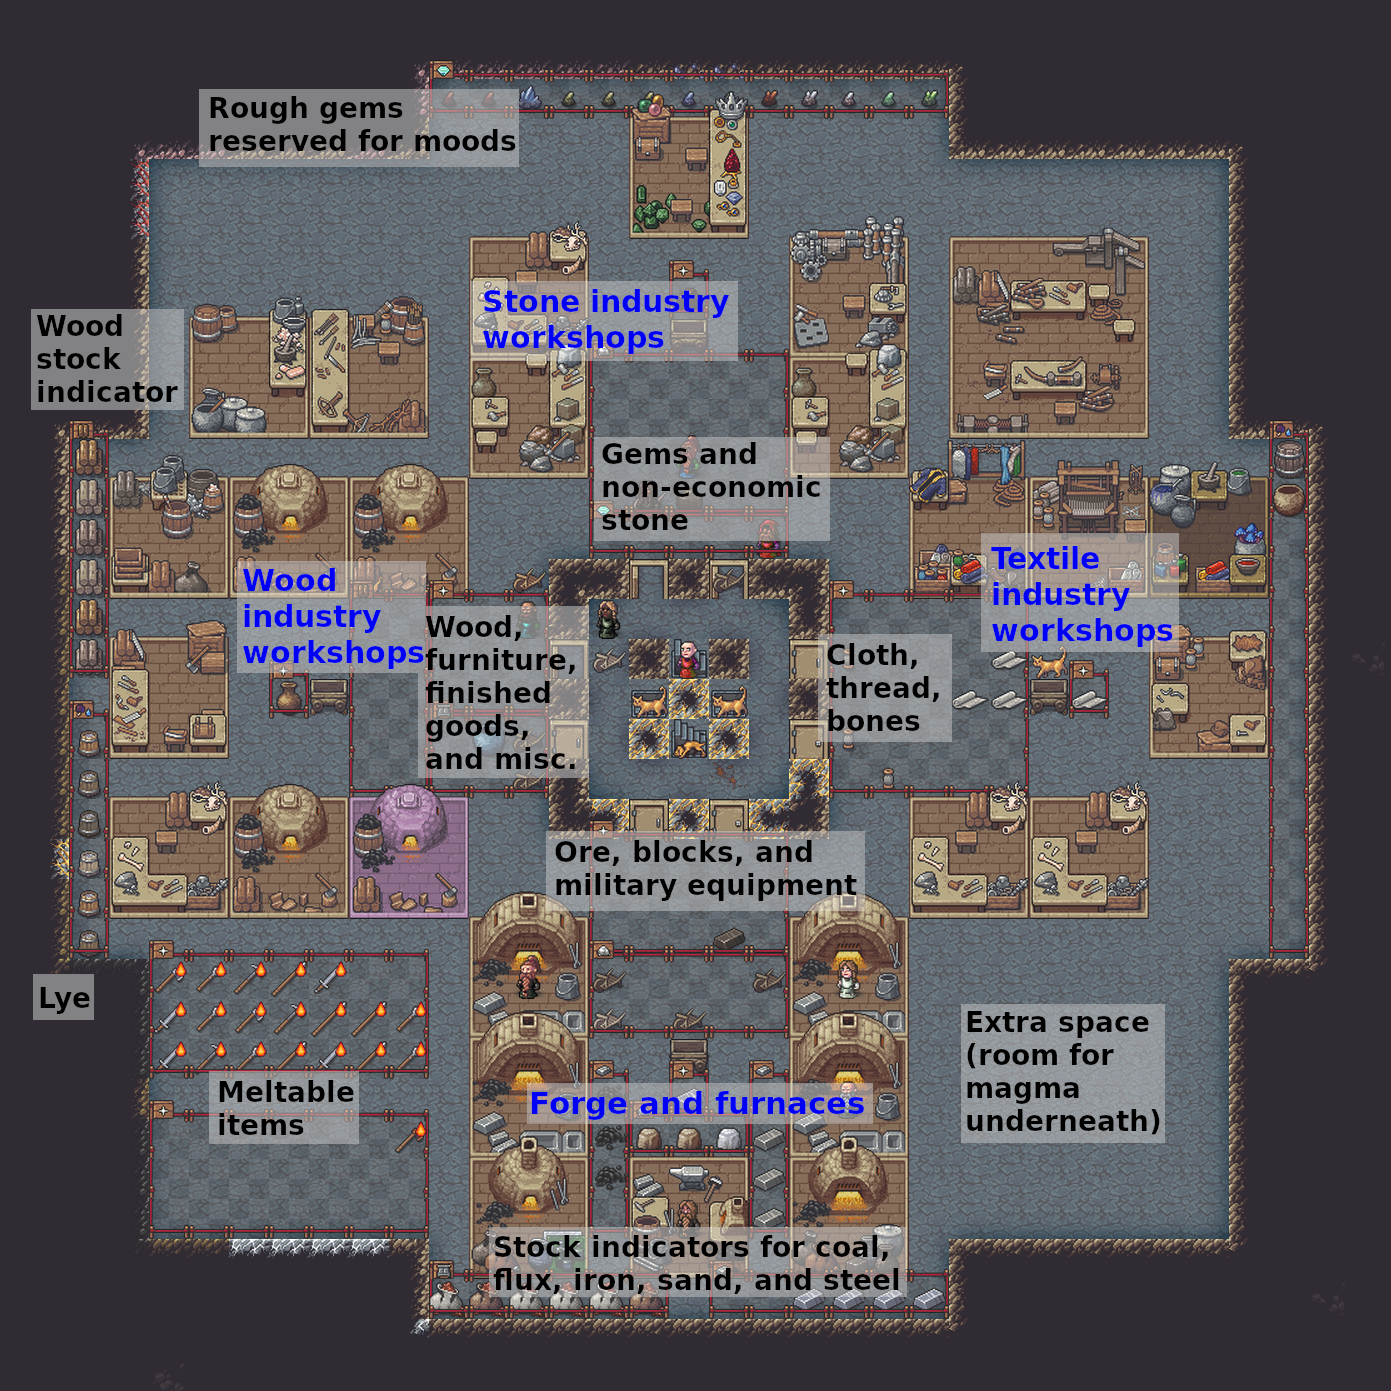
The industry level is densely packed and has more intricate stockpile and hauling route configuration.
In order to be a target for a stockpile or workshop link, the stockpile or building must have a name. That’s not the only reason you should give things names, though. The game is just much easier to play when stockpiles and key buildings have descriptive names. Which lever controls the bridge named “Right outer gate”? You can click on that bridge, click on “show linked buildings”, zoom to the lever, and click on the lever. Or you can scan your mouse over the levers and click on the lever with the same name as the target bridge. You can always edit names in-game, but blueprints are a great way to automate this task.
Some of the feeder stockpiles on this level are split up so that no one item type can fill the whole pile. The track stops that drive the quantum stockpiles have to take from all of them at once. When specifying multiple link targets that have spaces in their names, remember to surround the whole list with quotes. For example:
#build
trackstopW{name="Goods/wood dumper" take_from="Wood feeder,Goods feeder,Furniture feeder" route="Goods/wood quantum"}
The services level: handling multi-level dig blueprints
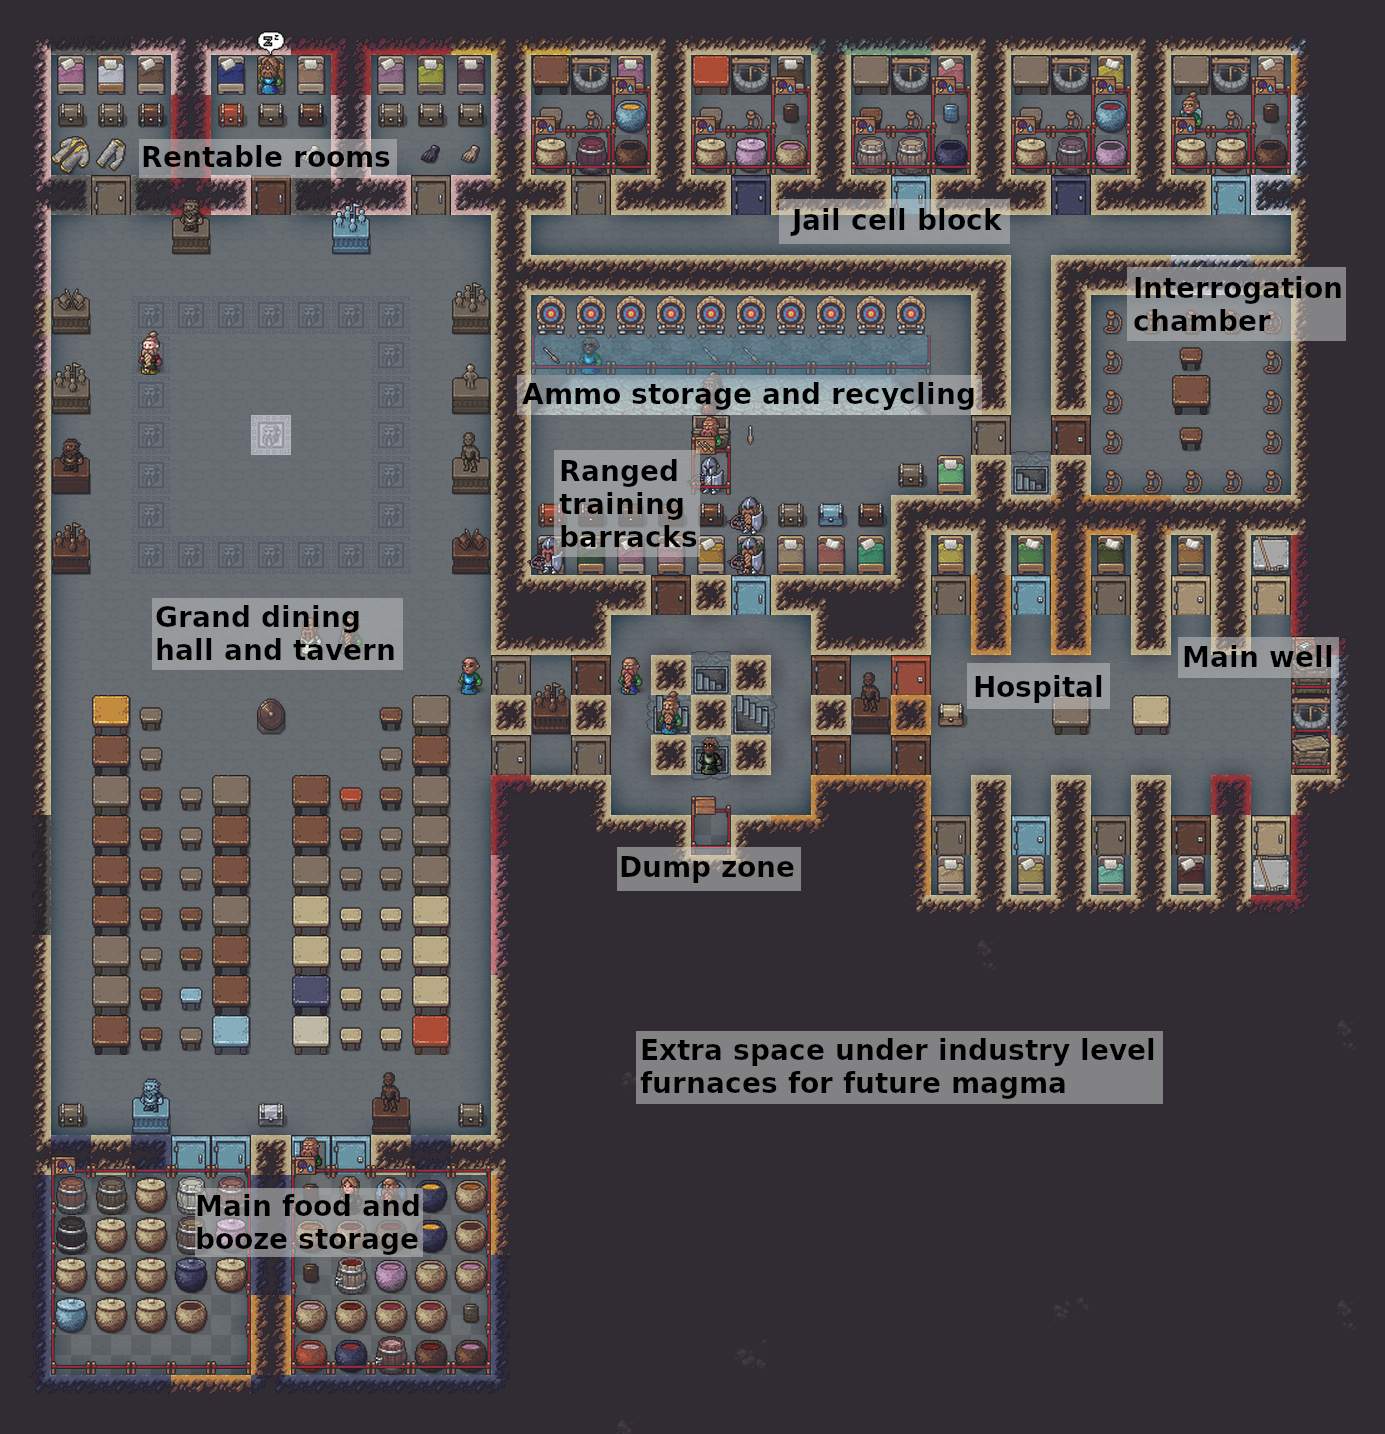
Services is a multi-level blueprint that includes a well cistern beneath the main level. Unwanted ramps caused by channeling are an annoyance, but we can avoid getting a ramp at the bottom of the cistern with careful use of dig priorities.
We can ensure
the bottom level is carved out before the layer above is channeled by assigning
the channel designations lower priorities (the h5s in the lower layers –
scroll down on the blueprint spreadsheet). This works here because there is
only a single column of higher-priority stairs for a dwarf to dig down to get
below the lower-priority channels. If the dig area has multiple tiles exposed,
it is harder to control dig order since a second dwarf may not have access to
any higher-priority tiles and may start digging the lower-priority designations
prematurely.
An alternative is to have a follow-up blueprint that removes any undesired ramps. We did this on the surface and farming levels with the miasma vents since it would be too complicated to synchronize simultaneous digging of the two layers.
The guildhall level: avoiding smoothing issues
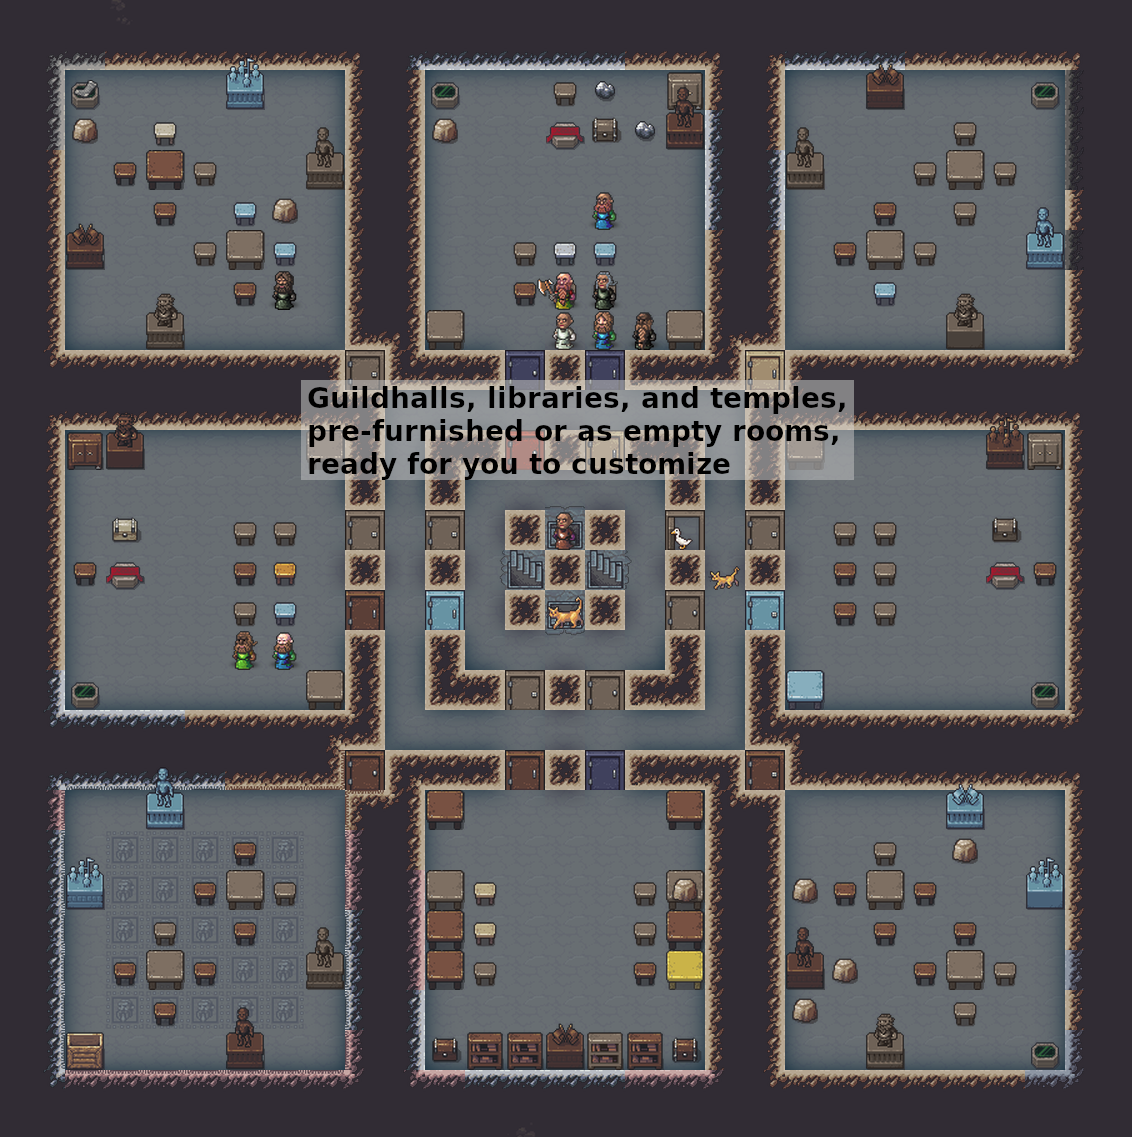
The goal of this level is to provide rooms for locations like guildhalls,
libraries, and temples. The value of these rooms is very important, so we are
likely to smooth and engrave everything. To smooth or engrave a wall tile, a
dwarf has to be adjacent to it, and since some furniture, like statues, block
dwarves from entering a tile, where you put them affects what you can access.
In the guildhall level, the statues are placed so as not to block any wall corners. This gives the player freedom for choosing when to smooth. If a statue blocks a corner, or if a line of statues blocks a wall segment, it forces the player to smooth before building the statues. Otherwise they have to bother with temporarily removing statues to smooth the walls behind them.
The suites level: balance of flexibility
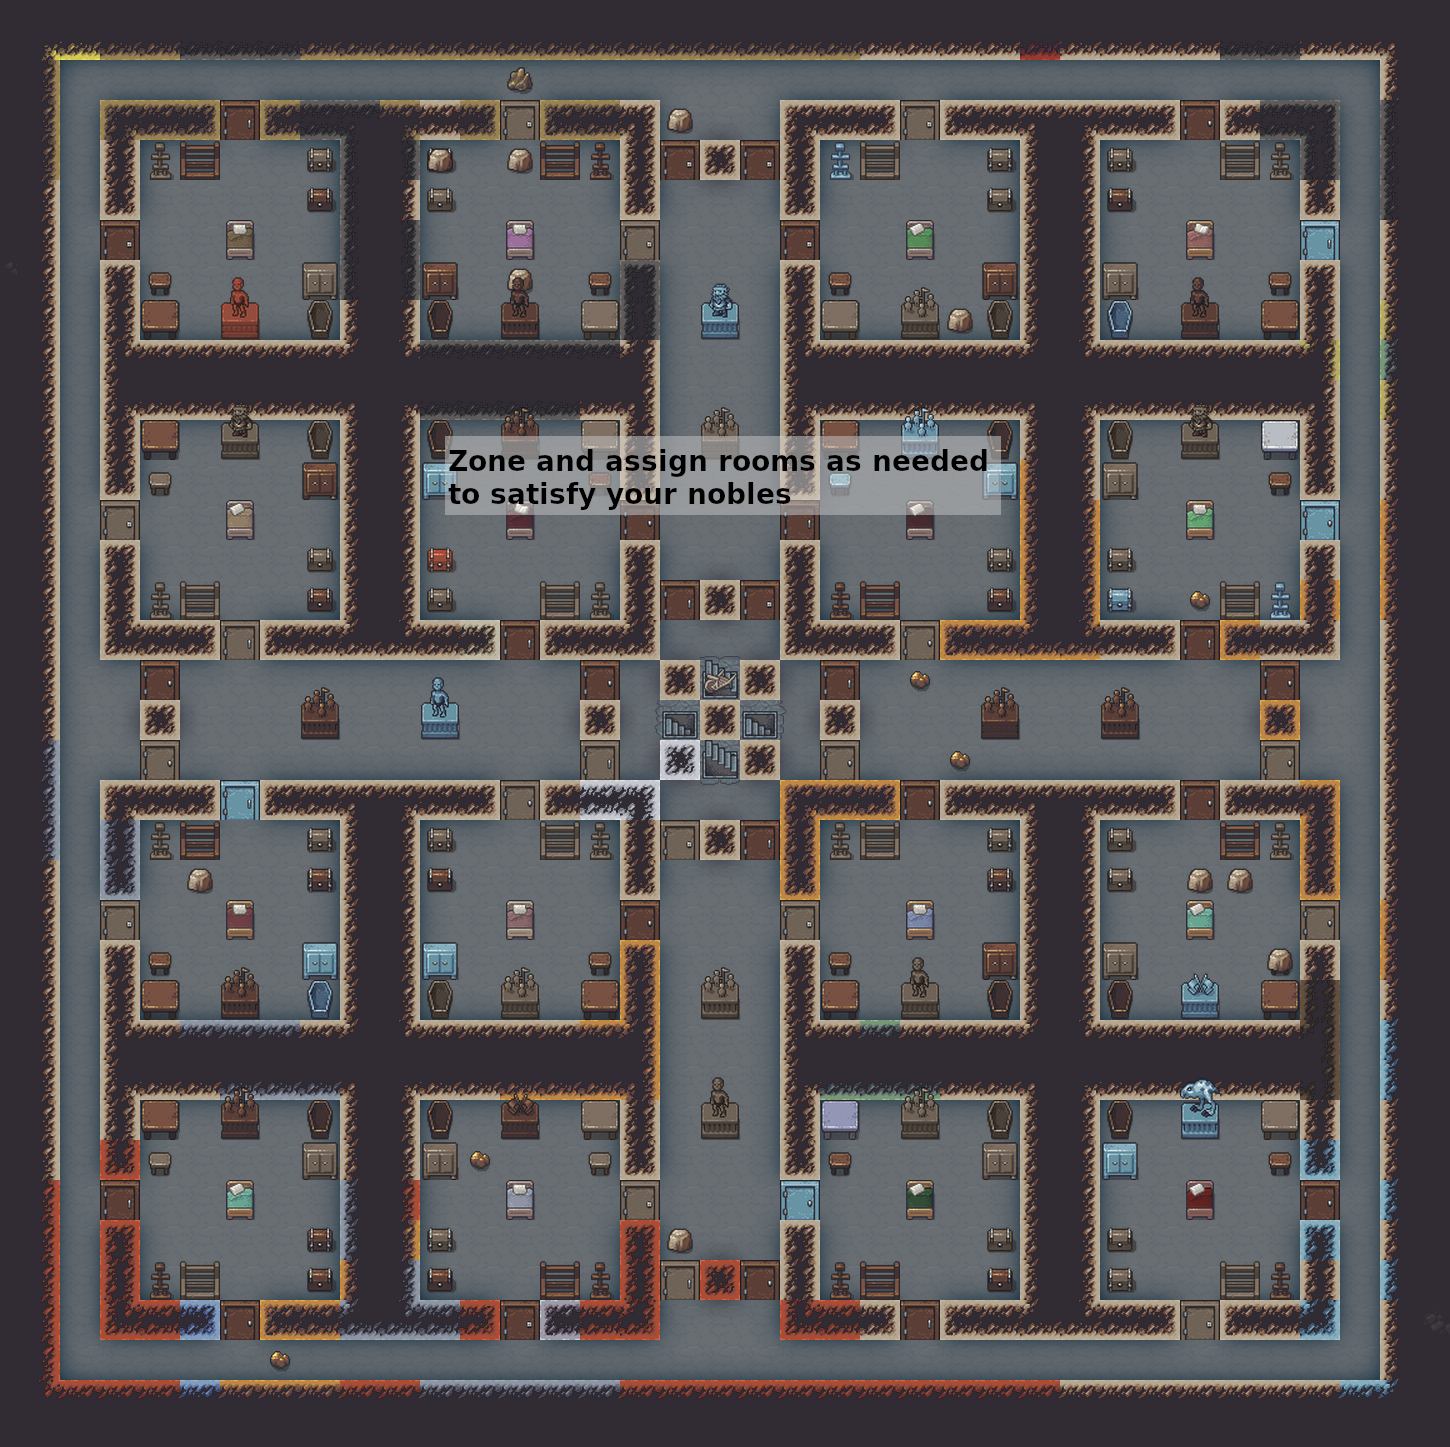
In designing this level, we needed to choose between two approaches:
Create rooms with specific, pre-determined purposes, laying out furniture and zoning with appropriate types
Lay out each room the same so each can serve any purpose
Each has pros and cons. The first option reduces more toil by pre-creating the zones. If we go this route, we can also auto-assign the rooms to the various roles (if they exist when the blueprint is run). Each room can be customized for its intended purpose: offices can look like offices, bedrooms could look like bedrooms, and so on. However, if the needs of the fort don’t correspond to the pre-determined layouts, or if the needs of the fort change significantly, then the blueprint can become more of a hinderance than a help.
As you can see from the screenshot, we went with option 2. The ability to re-zone arbitrarily to meet changing noble needs was too great of a benefit to ignore. The downside, of course, is that you have to zone and assign your own rooms. However, as soon as you gain a barony or a duchy, you’d be doing that anyway with option 1.
With option 2, if you need a “better” bedroom, you’d just expand the zone to cover the neighboring “unit”. Satisfying the monarch is also simple: plop down a new suites level and assign each block of 4 rooms to one zone. four units for the bedroom, four for the office, four for the dining hall, and four for the tomb. Smooth and engrave and you’re done. Of course, more aesthetic-minded players are always free to design custom areas too. These blueprints are designed to be functional more than beautiful.
The beds and crypt levels: copy and paste and repeat
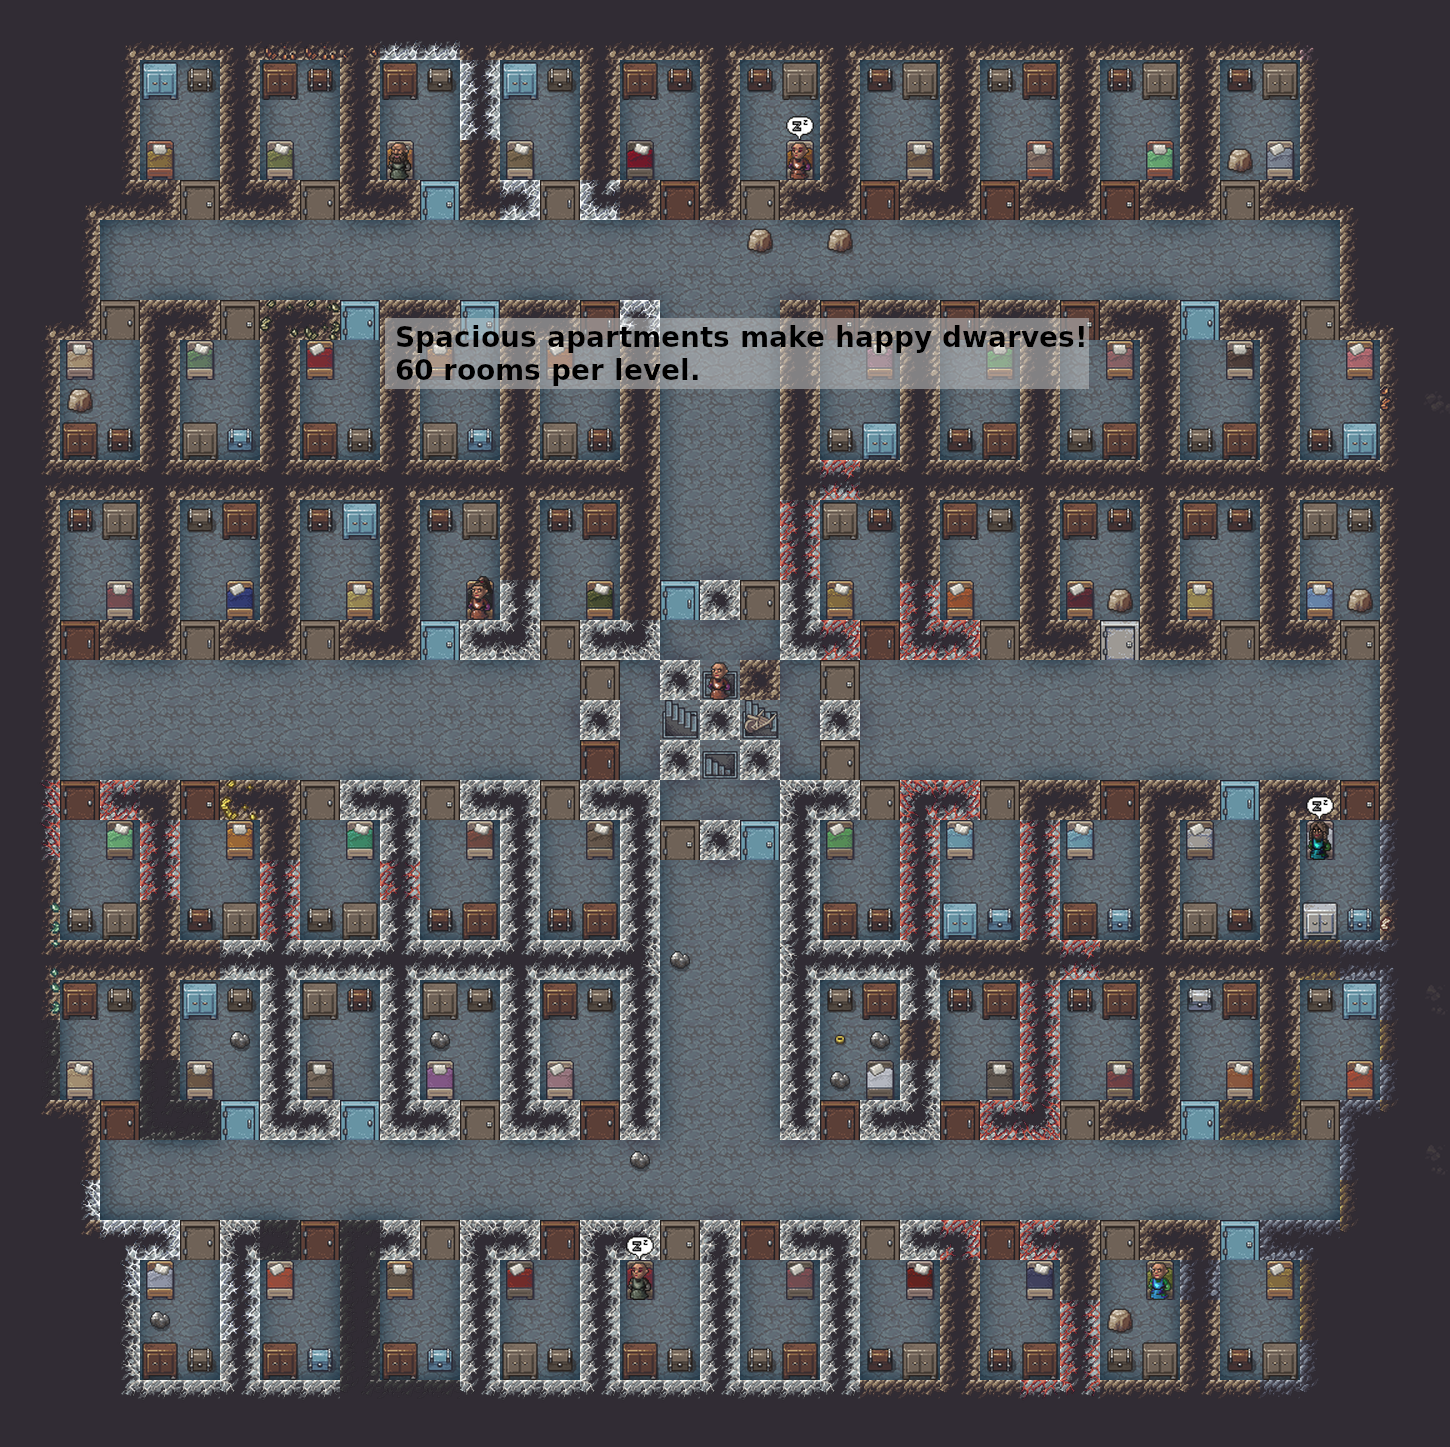
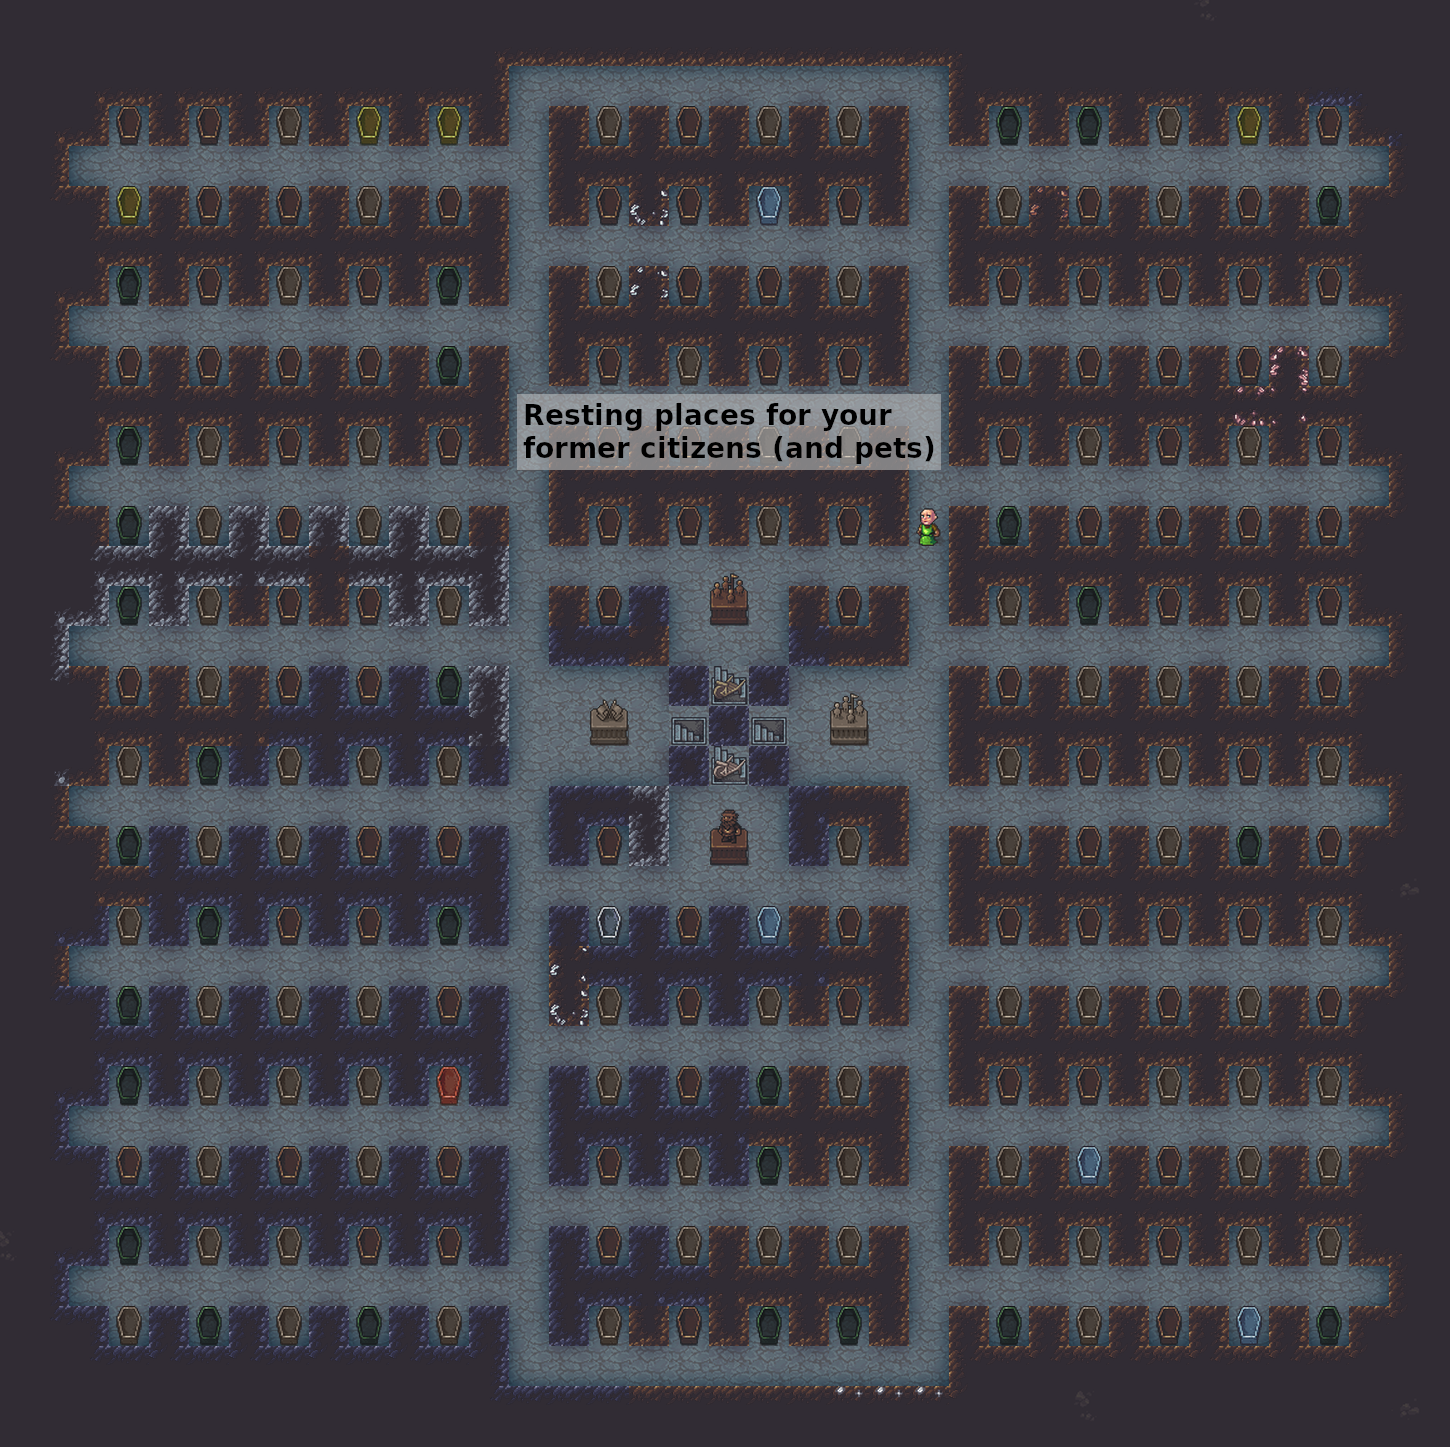
The apartments and crypt blueprints are straightforward, other than the sheer number of zones. Copy-paste in Google Sheets was used heavily here. The only fancy bit is the meta blueprint that digs the stack of apartment levels, which brings us to our final tip:
We couldn’t use this technique for the entire fortress since there is often an
aquifer between the farming and industry levels, and we can’t know beforehand
how many z-levels we need to skip. We can, however, automate the digging of
everything from the industry level down, including designating all apartment
levels at once. See the
#meta
blueprint in the Dreamfort help spreadsheet
for how it uses a repeat() marker for the /apartments1 blueprint to
apply it to three z-levels at once.
That’s it! I hope this guide was useful to you. Please leave feedback on the forums or on the DFHack Discord server if you have ideas on how this guide (or the dreamfort blueprints themselves) can be improved!
Links
Quickfort links:
Related tools:
DFHack’s blueprint plugin can generate blueprints from actual DF maps.
DFHack’s buildingplan plugin sets material and quality constraints for quickfort-placed buildings.
Python Quickfort is the previous, Python-based implementation that DFHack’s quickfort script was inspired by.
Appendix: Symbols and properties
#dig mode reference
Symbol |
Meaning |
|---|---|
|
dig (mine out walls but leave the floors) |
|
channel (empty tile with a ramp in the z-level below) |
|
up stair |
|
down stair |
|
up/down stair |
|
ramp (produces empty tile in the z-level above) |
|
remove up stairs/ramps |
|
chop trees |
|
gather plants |
|
smooth walls or floors |
|
engrave smoothed walls or floors |
|
carve fortification |
|
carve track |
|
toggle whether engraving details are visible |
|
toggle marker (called “blueprints” by the DF interface) |
|
remove construction |
|
remove designation |
|
claim items on this tile |
|
forbid items on this tile |
|
melt items on this tile |
|
remove melt flag from items on this tile |
|
dump items on this tile |
|
remove dump flag from items on this tile |
|
hide items on this tile |
|
unhide items on this tile |
|
set high traffic |
|
set normal traffic |
|
set low traffic |
|
set restricted traffic |
|
carve track that extends to the north |
|
carve track that extends to the south |
|
carve track that extends to the east |
|
carve track that extends to the west |
|
carve track that extends to the north and south |
|
carve track that extends to the east and west |
|
carve track that extends to the north and east (corner) |
|
carve track that extends to the north and west (corner) |
|
carve track that extends to the south and east (corner) |
|
carve track that extends to the south and west (corner) |
|
carve track that extends to the north, south, and east (tee) |
|
carve track that extends to the north, south, and west (tee) |
|
carve track that extends to the north, east, and west (tee) |
|
carve track that extends to the south, east, and west (tee) |
|
carve track that extends in all directions (cross) |
You can carve a track over an existing natural ramp to allow a minecart to
safely traverse z-levels. You can write trackramp<dir> instead of
track<dir> (e.g. trackrampSW) for clarity in blueprints where this is
the intention. The actual designation produced by track<dir> and
trackramp<dir> is identical.
Any of the symbols can be prefixed by any number of marker specifications:
Marker |
Meaning |
|---|---|
mb |
“blueprint” mode |
mw |
warm dig |
md |
damp dig |
For example, a 10x10 block of standard dig tiles with warm + damp markers would
be mwmdd(10x10).
#zone mode reference
Symbol |
Type |
Properties |
|---|---|---|
|
meeting area |
|
|
bedroom |
|
|
dining hall |
|
|
pen/pasture |
|
|
pit/pond |
|
|
water source |
|
|
dungeon |
|
|
fishing |
|
|
sand |
|
|
office |
|
|
dormitory |
|
|
barracks |
|
|
archery range |
|
|
garbage dump |
|
|
animal training |
|
|
tomb |
|
|
gather/pick fruit |
|
|
clay |
In addition to the type-specific properties listed above, all zones support the following properties:
Property |
Description |
|---|---|
|
the name of the zone |
|
if set to |
|
if set to the name of a noble or administrative position
(like |
|
the type of location to create and attach the zone to: one
of: |
|
(only if |
|
(only if |
|
(only if the location is set to the relevant type) sets the desired number of stocked items for the attached location. See the table below for details. |
Here are the desired items that can be specified for each location type:
Location type |
Properties |
|---|---|
tavern |
|
hospital |
|
library |
|
temple |
|
#place mode reference
The symbol or symbols used to declare a stockpile determine which item categories are enabled by default as well as which stockpile containers (e.g. bins/barrels/wheelbarrows) are assigned to the stockpile by default.
Symbol |
Type |
Containers |
|---|---|---|
|
animal |
|
|
food |
barrels |
|
furniture |
|
|
coins |
bins |
|
corpses |
|
|
refuse |
|
|
stone |
wheelbarrows |
|
wood |
|
|
gem |
bins |
|
bars and blocks |
bins |
|
cloth |
bins |
|
leather |
bins |
|
ammo |
bins |
|
sheets |
bins |
|
finished goods |
bins |
|
weapons |
bins |
|
armor |
bins |
|
custom |
All stockpiles support the following properties:
Property |
Description |
|---|---|
|
the name of the stockpile |
|
comma-separated list of names or building ids of stockpiles or workshops that the stockpile takes from |
|
comma-separated list of names or building ids of stockpiles or workshops that the stockpile gives to |
|
if set to |
|
the number of desired barrels |
|
the number of desired bins |
|
the number of desired wheelbarrows |
|
sets the desired numbers for barrels, bins, and wheelbarrows. this is most useful to set all desired container counts to 0. |
|
if set to |
|
if set to |
|
if set to |
|
if set to |
|
if set to |
|
if set to |
|
if set to |
Note that specifying building IDs in take_from or give_to lists is
primarily useful when dynamically generating quickfort blueprints and
applying them via the API. You will not generally know the ID of a stockpile or
building when writing a blueprint by hand or when preparing a blueprint to
apply in a different fort.
#build mode reference
In addition to the type-specific properties listed in the symbol table below,
all building types accept the name and do_now properties. The
do_now property, if set to true, will cause the building to be built at
high priority as soon as possible.
Moreover, all workshops and furnaces (both called “workshops” below) accept the following “profile” properties:
Property |
Description |
|---|---|
|
the maximum number of general workorders that the workshop will accept |
|
comma-separated list of names or building ids of stockpiles that the workshop takes from |
|
comma-separated list of names or building ids of stockpiles that the workshop gives to |
|
comma-separated list of labors that should be enabled for the workshop. all unlisted labors for the workshop will be disabled. |
|
comma-separated list of labors that should be disabled
for the workshop. all unlisted labors for the workshop
will be left enabled. if both the |
|
the minimum skill rating for units that perform jobs at the workshop |
|
the maximum skill rating for units that perform jobs at the workshop |
For the labor and labor_mask properties, you can use either the labor
ID or the readable caption string. You can see both options by running:
:lua for idx,name in ipairs(df.unit_labor) do cap=df.unit_labor.attrs[idx].caption if cap then print(('%22s %25s'):format(name, cap)) end end
For example, you can specify either BONE_CARVE or "Bone Carving" (it
contains a space – don’t forget the surrounding quotes!) to indicate the bone
carving labor.
Likewise, for the min_skill and max_skill properties, you can specify
either the skill rating ID or the readable caption string. You can see both
options by running:
:lua for idx,name in ipairs(df.skill_rating) do cap=df.skill_rating.attrs[idx].caption if cap then print(('%22s %25s'):format(name, cap)) end end
Symbol |
Type |
Properties |
|---|---|---|
|
armor stand |
|
|
bed |
|
|
seat |
|
|
burial receptacle |
|
|
door |
|
|
floodgate |
|
|
floor hatch |
|
|
wall grate |
|
|
floor grate |
|
|
vertical bars |
|
|
floor bars |
|
|
cabinet |
|
|
container |
|
|
weapon rack |
|
|
statue |
|
|
slab |
|
|
table |
|
|
bridge (retracting) |
|
|
bridge (raises to north) |
|
|
bridge (raises to east) |
|
|
bridge (raises to south) |
|
|
bridge (raises to west) |
|
|
well |
|
|
glass window |
|
|
gem window |
|
|
trade depot |
|
|
screw pump (pumps from north) |
|
|
screw pump (pumps from east) |
|
|
screw pump (pumps from south) |
|
|
screw pump (pumps from west) |
|
|
water wheel (vertical) |
|
|
water wheel (horizontal) |
|
|
gear assembly |
|
|
horizontal axle (east-west) |
|
|
horizontal axle (north-south) |
|
|
vertical axle |
|
|
roller (pushes to south) |
|
|
roller (pushes to west) |
|
|
roller (pushes to north) |
|
|
roller (pushes to east) |
|
|
support |
|
|
animal trap |
|
|
restraint |
|
|
cage |
|
|
archery target |
|
|
traction bench |
|
|
nest box |
|
|
hive |
if |
|
offering place |
|
|
bookcase |
|
|
display furniture |
|
|
buildable instrument |
|
|
farm plot |
if |
|
paved road |
|
|
dirt road |
|
|
vermin catcher |
|
|
leather works |
|
|
quern |
|
|
millstone |
|
|
loom |
|
|
clothier |
|
|
bowyer |
|
|
carpenter |
|
|
metalsmith |
|
|
magma forge |
|
|
jeweler |
|
|
stoneworker |
|
|
butcher |
|
|
tanner |
|
|
craftsdwarf |
|
|
siege workshop |
|
|
mechanic |
|
|
still |
|
|
farmer |
|
|
kitchen |
|
|
fishery |
|
|
ashery |
|
|
dyer |
|
|
soap maker |
|
|
screw press |
|
|
wood furnace |
|
|
smelter |
|
|
magma smelter |
|
|
glass furnace |
|
|
magma glass furnace |
|
|
kiln |
|
|
magma kiln |
|
|
ballista |
|
|
bolt thrower |
|
|
catapult |
|
|
wall |
|
|
reinforced wall |
|
|
floor |
|
|
ramp |
|
|
up stair |
|
|
down stair |
|
|
up/down stair |
|
|
fortification |
|
|
track stop (no dumping) |
|
|
track stop (dump to north) |
|
|
track stop (dump to south) |
|
|
track stop (dump to east) |
|
|
track stop (dump to west) |
|
|
stone-fall trap |
|
|
weapon trap |
|
|
lever |
|
|
pressure plate |
|
|
cage trap |
|
|
upright spear/spike |
|
|
track to the N |
|
|
track to the S |
|
|
track to the E |
|
|
track to the W |
|
|
track to the N, S |
|
|
track to the E, W |
|
|
track corner to the N, E |
|
|
track corner to the N, W |
|
|
track corner to the S, E |
|
|
track corner to the S, W |
|
|
track tee to the N, S, E |
|
|
track tee to the N, S, W |
|
|
track tee to the N, E, W |
|
|
track tee to the S, E, W |
|
|
track cross |
|
|
track ramp to the N |
|
|
track ramp to the S |
|
|
track ramp to the E |
|
|
track ramp to the W |
|
|
track ramp to the N, S |
|
|
track ramp to the E, W |
|
|
track ramp corner to the N, E |
|
|
track ramp corner to the N, W |
|
|
track ramp corner to the S, E |
|
|
track ramp corner to the S, W |
|
|
track ramp tee to the N, S, E |
|
|
track ramp tee to the N, S, W |
|
|
track ramp tee to the N, E, W |
|
|
track ramp tee to the S, E, W |
|
|
track ramp cross |
#burrow mode reference
Symbol |
Meaning |
Properties |
|---|---|---|
|
add |
|
|
erase |
|